
How to move all applications to sd. How to move applications to an Android memory card? Transfer applications to the SD card through Android settings

A smartphone is not only a convenient dialer, but also a full-fledged entertainment center. However, immediately after purchase, there are not many applications, games and interesting features in the device itself. To eliminate this drawback, the user is provided with a huge selection of applications for every taste in the Google Play On-line store (we described how to install applications in this article).
Sooner or later, any person who installs various applications on their smartphone or tablet will face the problem of lack of free space in the device’s memory, although there are still a lot of free Gigabytes on the memory card. This is due to the fact that most applications are installed in the memory of the smartphone/tablet itself, which is not very much, and not on the memory card. The result is a lack of free space, a decrease in the speed of the device, and constant slowdowns. This problem can be solved in different ways:
Option 1. A radical solution to the problem - Hard Reset
This step is good because the smartphone returns to factory settings and literally begins to “fly”, since it is not overloaded with unnecessary data and is not clogged with files. But on the other hand, the user is forced to reinstall all applications and restore deleted data. We talked about how to do a Hard Reset in this article.
Modern phones and tablets use excellent camera modules, which sometimes allow you to take professional photos. However, as the quality of the images themselves increases, so does the size of the photographs, which take up a lot of space. If your device runs out of free space, you should free it up. This can also be done using a memory card, to which we will transfer photos and, accordingly, free up space on the device.
Moving photos from main memory to a memory card
In order to transfer images to a memory card, you will need the memory card itself, installed in your smartphone or tablet, and a file manager.
Here is the memory card:

After you install the memory card in your smartphone, you can make sure that the device “sees” it. To do this, go to “Settings” and select the “Memory” subsection (or “Device Maintenance”, as is the case with Samsung and the One UI firmware).


Here, find the “SD memory card” item. As you can see, our device recognized the card.

Now you will need a file manager. You can use any application of your choice as a file manager, since the transfer process itself will be similar. If FM is already installed in your firmware, you can use it. If not, download using Google Play Store. We will use Samsung's built-in file manager - “My Files”.

Click "Images".

Select the files you want to move (press and hold the file, then select others if there are several of them). At the bottom of the screen, click "Copy" or "Move" - depending on what you need to do.

Let's go back a step and select the “flash drive” we added.

If you want to add files to the root of the memory card, just click “Move here”.

Happened.

You can create a folder by clicking on the three dots and selecting “Create Folder” from the menu.

Specify the name of the folder.

Open it and transfer files in the same way.

As you can see, nothing complicated. In this way, you can transfer other files to the memory card, with the exception of applications, or you can transfer from the memory card to the main memory.
Applications in the Android OS are installed by default in the internal memory section. Therefore, owners of devices with 8/16 GB drives often face a lack of free space on their Android device, which can be solved by transferring applications to an SD memory card. If you do not do this, you will lose the ability to install programs on your smartphone or tablet; you will not be able to download data from the Internet or receive a file via bluetooth/NFC/Wi-Fi. Because for these purposes, internal memory is used by default.
In order to continue to fully use your smartphone or tablet, you need to transfer massive applications to an external memory section. How to transfer applications from internal memory to an SD card on Android, read on.
Preface
Applications consist of two main components - the program itself and the cache. The latter is an additional file for correct operation, not to be confused with temporary data. More often, this approach is used in games where developers place graphics or additional content with a volume of 15-100 MB and up to 2-3 GB. Whereas in most programs, due to its small size, separating the cache into an additional file does not make sense.
Early versions of Android allow you to transfer the cache to a memory card. It is worth mentioning that this function must be supported by the OS, for which the manufacturer and developer are responsible and must enable portability in the application. Otherwise, you cannot do without ROOT rights.
Standard method
Android devices up to 4.0 and some models with version 4.2 and higher allow you to move applications and/or cache through the settings menu. To do this, you need to open the device settings, the “applications” item and select the desired program. After information about the occupied memory space, there is a “move to SD card” button. Don't be confused by the different name.
Main advantages:
- Simplicity. No ROOT rights required.
Main disadvantages:
- Moving applications to an SD card is not available on all devices.
- You cannot migrate an application if the feature is not implemented by the developer and manufacturer.

Third Party Applications
If the standard method does not work or is not convenient, it is recommended to try third-party programs as an alternative: AppMgr III (App 2 SD), Link2SD or Folder Mount. The listed utilities allow you to identify roaming applications, view detailed information about occupied space, etc.
AppMgr III (App2SD)
A simple and not overloaded application for transferring programs to a memory card, viewing free space, clearing temporary cache, etc. To move an application:
- Open the hidden panel by clicking on the 3 bars at the top left of the screen.
- Select "Move applications".
- On the “Movable” tab, mark the program.
- Confirm the move in a new window.


If you grant AppMgr III ROOT rights, the program's capabilities will expand, allowing you to transfer previously unavailable applications.
Main advantages:
- Information content.
- Additional functions: freezing programs, quickly clearing temporary cache, etc.
- It is not necessary to have ROOT rights.
Main disadvantages:
- On devices where app transfer is blocked at the system level, roaming is not supported.
- Additional features are not available without ROOT rights.
- Some features are hidden in the free version of the program.
Link2SD
A more functional utility that supports transferring applications to a MicroSD card in three different ways:
Link
The application, including system and all associated files, are transferred to a previously created 2nd partition on the MicroSD card. At the same time, a link is created so that the system continues to “consider” the moved application installed in the internal memory section. ROOT required.
External Data Folder Link
The method is similar to the previous one, but creating an additional partition on the MicroSD card is not necessary. This is the best option if you need to transfer a large cache of a game or program. The instructions are simple and consist only of confirming the actions:
- You need to select the application and click on the “send” button.
- Select which data needs to be moved.
- In a new window, select a section if the map is divided into two or more parts.
- Wait until the procedure is completed.
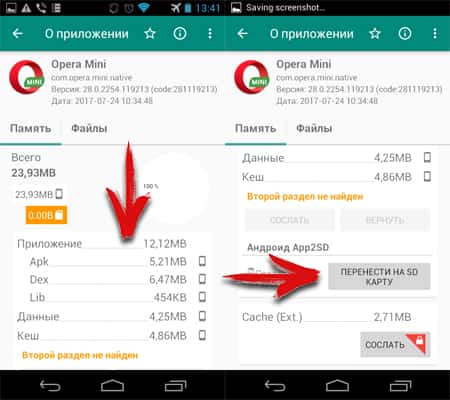
Transfer to MicroSD card (App2SD)
The method is similar to that described for AppMgr III. Allows you to transfer applications and cache. ROOT is not required.
Main advantages:
- Information content.
- Wide range of options for transferring cache and applications.
- It is not necessary to have ROOT rights for the App2SD method.
Main disadvantages:
- Moving does not work on devices where the function is blocked at the system level.
- ROOT is required for full operation.
- Most features are not available in the free version of the program.
Folder Mount
The utility allows you to transfer folders with application data, leaving links for the system to maintain correct operation. To move you need:
- Launch Folder Mount and create a pair. To do this, click on the “+” button on top, or in a hidden window on the left, which opens at the click of a button in the form of three stripes.
- Set parameters. The name is used to understand which application was transferred. Source – the folder that needs to be moved. Destination – Folder for the final location.
- Click the checkmark icon at the top.
- In the window that appears, make a choice: “yes” - the final folder will be created automatically, “no” - select the final folder manually.
- Wait until the files are transferred.


Main advantages:
- Easy to transfer applications.
Main disadvantages:
- Requires ROOT for full operation.
How to transfer applications to a memory card using Adoptable storage
The function is available on all devices starting from Android 6.0. The principle of operation is to create a single data array from internal and external storage. After activating Adoptable storage, by default applications are installed on the internal drive, after which they are transferred in the “Standard Method” described at the beginning of the article to an external area - MicroSD. The Adoptable storage method does not require ROOT rights, but requires preliminary formatting of the memory card, which will erase all existing information.
Instructions for activating Adoptable storage:
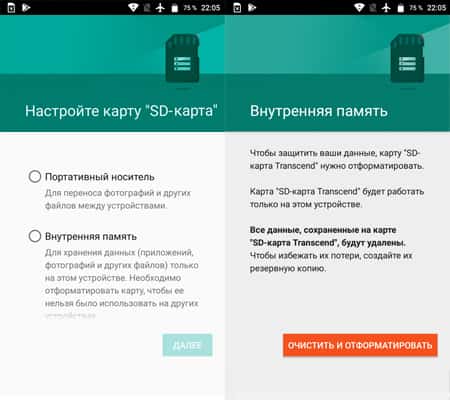
- Insert a MicroSD card and wait for a suggestion about how to use it in the notification bar. The gear icon will allow you to customize the map.
- In the new window, select “Internal memory” and click “next”.
- Confirm the action and click on the “clean and format” button. Please note that all data on the MicroSD will be deleted.
- Wait until formatting is complete.
- The system will offer to transfer some of the data to an external drive to free up space on the internal drive. It is not necessary to transfer files immediately.
- After that, go to settings, then applications. Select the program and select “storage” in the new window. The “change” button will allow you to move the application to an external area of the shared disk.

Important! To use Adoptable storage, it is recommended to use a memory card with a high data transfer speed, at least class 10. Otherwise, the performance of the device will decrease.
Main advantages:
- Simplicity of the method.
- ROOT rights are not required.
Main disadvantages:
- MicroSD data is encrypted, which prevents the card from being used in other devices. If the device fails, you will not be able to retrieve photos from the memory card.
- Only devices running Android 6.0 and higher are supported.
- For efficient operation, a MicroSD card with high data transfer speed is required.
Conclusion
If there is not enough internal space, and you are wondering: how to transfer applications to a memory card on Android, one of the methods described above will definitely help. The easiest one is to check the movement using the App2SD method in the settings. Owners of devices with a modern version of Android, 6.0 and higher, have access to the Adoptable storage method. Otherwise, you will need ROOT rights to move the entire application or just a folder with massive data, which Folder Mount and Link2SD can do.
(3 ratings, average: 5,00 out of 5)
Often, owners of Android smartphones are faced with the fact that the internal memory of the device is full to capacity, and therefore it is not possible to install a new application. To answer the question of how to transfer applications to a memory card, we have prepared this material.
Longtime fans of Android OS know that starting from Android 2.2 and up to Android 4.4, there was a function for transferring applications to a memory card. Some firmware still have it, so first of all we recommend trying the following method.
Internal capabilities of Android OS
Go to “Settings” and select “Applications”. Having selected the software you plan to transfer, open its settings window and select “Transfer to SD card” from the menu. We remind you that almost all developers guarantee the stable operation of their product only if it is installed on an internal drive.
Another option is available starting from Android 6.0. You can use the SD card as part of the internal storage using the Adoptable Storage feature. The system will format and encrypt the flash drive, making it impossible to use the card outside of your smartphone.
Activation of the Adoptable storage function occurs as follows: in the smartphone settings, select the “Memory” section, then click on the SD card and with a long tap go to its “Settings”, then select “Format as internal memory” and “Erase & Format”.

After completing these steps, you should select the “Use as internal storage” option, and then restart your smartphone. After this, an additional “Memory” tab will appear in the application menu, with which you can transfer it to an SD card. If these methods are not available in your firmware, and the desired application cannot be transferred, then you should turn to special applications.
Software
« Move to SDCard» is the simplest program designed for transferring applications. By selecting “Move to memory card” in the menu, find the desired application, click on it and click “Move”. Also among the program's functions you will find the ability to delete applications and manage APK files, that is, install applications from third-party sources.

If you have root rights, you can use this application to clean your smartphone of pre-installed junk. The program is free, but if you are annoyed by advertising inside the application, you will have to pay 67 rubles for its disappearance.
AppMgr III

A more advanced tool that allows, in addition to the banal transfer of applications, to also perform any manipulations with them. The transfer works exactly according to the same scheme as in the previous application, so let’s dwell on its other features. AppMgr III can delete or hide an app, open its Google Play page, go to its Android settings, or clear its cache.

Using root rights, you can significantly expand the functionality - delete applications without confirmation, freeze them, and automatically transfer applications to a memory card after installation. The full version of the program, which allows you to install the program widget, update modules hourly, and so on, costs 179 rubles.
Link2SD
And here is a full-featured manager for advanced users. Let’s immediately make a reservation that the application requires root rights and configuration, and therefore for a one-time transfer of the application you can use a less labor-intensive option.

First, you need to create a hidden area on the memory card in the ext3/ext4 file system. The application uses this area as an emulator of the phone's internal memory. This can be done using the Android axis itself via Recovery, or using third-party applications for Windows.

In the first case, the route is as follows:
 Switch to Recovery mode. Depending on the smartphone, this can be achieved using the following methods:
- press the volume and power buttons at the same time;
- press the power button, and immediately after - the volume button;
- Press the volume, power and home buttons at the same time.
- Once in Recovery, select Advanced and click Partition SD Card.
- Select the ext3 file system and specify the size, for example 1024 megabytes. We set the size of the paging file to zero; it is already present in the system.
- We reboot the smartphone, after the reboot the memory card should decrease by the size of the hidden partition.

Another method for those who do not want to experiment with Recovery is to create a partition using EaseUS Partition Master. After installing this utility on your home PC, connect an SD card to it.

Having found the desired drive in the main window of the program, click on its partitions and click “Delete Partion”. When we have the only partition left with the Unallocated file system, select the reverse action - “Create Partition” and select ext3 as the file system type. Now we have a hidden section at our disposal.

Working with Link2SD
After creating a hidden partition, you should grant the application root rights and restart your smartphone. Transferring an application to a memory card is now done in two ways:


Among other functions of Link2SD, it is worth noting the following:
- convert to system ones;
- freeze;
- run, reinstall and uninstall;
- clear cache;
- erase data;
- create shortcuts on the desktop;
- open the settings page in Android;
- distribute the installation APK file.
All this is available even in the free version of the application, but for just 100 rubles you can purchase an extended version, which also allows you to automatically clear the cache, transfer external data from various applications, and, of course, get rid of advertising.
We hope that thanks to this article you have figured out the question of why data is not transferred to the flash card and how this problem is solved.
If you are reading this, it means you were interested, so please subscribe to our channel on , and for one thing, give it a like (thumbs up) for your efforts. Thank you!
Publications on the topic
-
 How to split a file into several parts for sending by email
Are you familiar with the situation when an attempt to record your favorite movie or game on a flash drive ends in failure? As a result, a window appears with...
-
 Free chess game analyzer "Creatica" for MS Windows by Arkady Polyakevich Chess program with move analysis
The article consists of two series, separated by years. Of course, over time you begin to look at many things differently, and also write differently....