
Realtek HD Manager - where to find it and how to configure it. How to install Realtek HD Manager on Windows: configure download update the program on Windows Realtek HD additional settings

Download Realtek HD for Windows and where to update Realtek HD Manager? What is it and why do computer specialists advise installing only it? Other advantages, advantages and reasons for installing this driver will be described further.
First of all, Realtek HD is a driver needed for adequate playback of any music files on all kinds of computers. It is important to understand that any part of the computer requires additional settings that the processor itself can “understand” and interact with them correctly.
This driver, among other things, includes utilities for setting up sound on a computer, including: volume, sound recording functions, support for the correct operation of the sound board and motherboard. It can also interact with Direct Sound 3D, which makes working with a variety of audio tracks much easier.

It is the drivers that help the processor “understand” what and how it should work. Monitor the correct operation of your computer and install the necessary programs. Don’t put off solving your computer-related problems until later. All answers can be found on our website.
What is Realtek HD Manager?
A set of functions to support all kinds of sound formats, which are appearing more and more often lately. The dispatcher's set includes audio codecs that provide high bandwidth. Thanks to the drivers, the user can count on high quality human speech recognition. The installation process of the manager is very simple, you need to download the software and follow a series of simple installation steps. You can download the Dispatcher by following the link. Below is a picture of the Realtek HD Manager menu.
Let's talk in more detail about setting up sound on the Windows 7 operating system.
If you have problems with sound, the first thing you should pay attention to is the sound card drivers. Most often, sound problems arise due to incompatibility of drivers and sound card. This problem can be solved by reinstalling the necessary drivers for the sound card.
If the problem persists after reinstallation, you need to check your audio equipment to see if it is damaged. Try to disable the equipment by going to the “Device Manager”, opening the “Properties” of the Computer. Having removed the sound card from the devices, disconnect it and connect it again.
First of all, you need to go to the “Start” menu and select the “Control Panel” section. In the section that appears, we find the “Sound” tab. It is in this tab that the sound settings in the operating system are configured. Opens “Manage sound devices”, select the sound card you are using and click “Properties”. In this menu you can completely configure the audio equipment and select the sound format. Check and select Exclusive mode. In case of incorrect settings, a default option is possible.
A set of basic technical parameters of Realtek HD:
Included with Realtek Sound Effect Manager is an assembly of Realtek Soundman drivers;
Realtek HD Manager is fully compatible with Direct Sound-3, A3-D and I3-LD compatible
Stylish and user-friendly interface, intuitive for any user; no knowledge of how to operate computer equipment is required.
A set of additional features, the introduction of surround sound, expansion of the functional component of the dispatcher.
Users of the Windows 7 operating system have access to a ten-band equalizer.
Built-in music player Realtek Media Player allows you to listen to audio files of any format
The dispatcher has built-in support for electronic musical instruments.
Using the tips that were received while reading the article, each user can easily install and configure the Realtek HD manager. If you encounter problems while connecting to a secure network, ask questions and leave comments under the article. Each user can suggest a topic for further discussion.
Realtek HD Manager and Sound Tuning
I installed Win7x64 OS and, accordingly, a more recent version of sound drivers from Realtek adapted for Win7x64. Before reinstallation, the mini-jack coming from the subbuffer was plugged into the orange input on the rear panel of the mat. board, after which the Realtek HD manager graphical interface window popped up, which is responsible for setting up the sound. In it I was given a choice between channel types: I could choose as lean. input and linear output, not to mention other sub-items. A similar interface popped up when connecting a device to absolutely any input.
I connected speakers to the orange connector due to a malfunction of the green line. input (one channel does not work - mono, details are higher in the same topic). When installing a new version of the Realtek HD manager, we see a new interface. It would seem that only the design has changed, but no, the functionality has also decreased. I'll explain why below.
Realtek HD Manager:
The pop-up window does not appear when certain connectors are connected, with the exception of the green line. entrance. All program settings are set correctly.
Clicking on an activated input is ignored by the device and does not display the function selection menu for the connected connector. Currently the speakers work through a green line. front panel input (front panel input is OK). However, this is not entirely convenient for me; I would like to connect through the back panel.
Well, the long-awaited question: how to configure the input configuration so that when connected to black, orange, etc. connectors, a choice of values is provided.
(output to front speakers/line output, etc.). Or was it automatically set to "front speaker output/line out" with consistent normal sound system operation? As I see, this cannot be done through the Realtek HD manager interface (either a bug or a deliberate reduction in functionality). Maybe there are other roundabout ways?
I tried it, to no avail. As I wrote above, I installed it on XP and it initially did not detect sound jacks (with the exception of green and headphones).
I plugged the plug from the subbuffer into the orange input, after which a graphical selection interface popped up, in which I specified the line output. Consequently, the orange input worked in the specified mode and worked, it should be noted, as it should.
Select output 5.1; right now only linear is used
Download Realtek High Definition Audio Manager driver package for Windows
Realtek High Definition Audio Driver #8212; This is a package of drivers that allows you to correctly play audio files on operating systems from Windows 2000 to Windows 10.
After installation, the manager appears in the control panel.
The package has the following advantages:
Sound drivers installed by default in Windows operating systems are unable to run some programs (for example, Skype) in the absence of Realtek drivers. In addition, Realtek allows you to use more careful settings for the highest quality sound output.
Realtek provides multi-functionality. With its help, you can simultaneously connect either several speakers or headphones with speakers using the Plug and Play system. In addition, there is support for most audio formats.
Convenient input and speech recognition.
User-friendly interface. Not every program can boast of a convenient, understandable and pleasant-looking interface for the average user. The advanced equalizer with four tabs stands out separately: “Sound Effect”, “Mixer”, “Sound Inputs/Outputs”, “Microphone”.
The ability to emulate 26 types of environments for the most effective gaming experience.
Ability to support microphone and electronic musical instruments.
There are three versions of drivers for audio devices:
The version is intended for integrated HD Audio in the operating system Windows Vista, Windows 7/8/8.1/10, as well as older operating systems such as Windows 2000/XP/2003.
A version of the so-called ATI HDMI Audio Device Driver is intended for installation on systems with motherboards based on AMD chips with an HDMI port.
The realtek hd manager driver package is one of the best because it is multi-functional and is supported not only by Windows OS, but also by Linux OS, a direct competitor of the former.
This package supports high-level audio output and has other gadgets for convenient work with audio files.
If you do not have it at #171; Start - Control Panel - Realtek HD Manager #187;. then you need to reinstall.
Realtek HD Manager 2.82 is a special audio control panel that is usually installed along with the driver for Realtek audio equipment. The software helps control the audio output and some other features.
Possibilities
What can Realtek HD do? This manager can be installed on any PC that has the appropriate equipment. It's all about its functionality.
- Plug & Play device support. The control panel helps you use devices using the “plug and forget” principle. When you connect a microphone, MIDI keyboard, or any other device, Realtek HD Manager automatically detects the device type and instantly configures it.
- Full support for popular interfaces. The manager easily works with Direct Sound 3D, I3DL2, A3D, ASIO, OpenGL and other popular audio interfaces. Thanks to this, you can get the highest sound quality.
- Built-in equalizer. The manager has an integrated ten-band graphic equalizer with many built-in presets. With its help, you can improve the sound of a particular composition.
- Speaker setup. The manager allows you to fully customize the output mode for speaker systems of any format. AC 2.0, 2.1, 5.1, 7.1 and so on are supported. The program can correctly direct the audio path to the desired channel.
- Sound recording. The dispatcher has a built-in application for recording audio from a microphone. Advanced technology is used, thanks to which the sound is high-quality and clear.
- Selecting an output device. You can choose either a standard Windows sound adapter (with low sound quality) or an advanced solution such as WASAPI or ASIO, which provides a high-quality audio path.
- Loudness compensation. Will help improve the quality of sound reproduction taken from vinyl records. A very useful option for those users who love the sound from records. Not suitable for CD.
- Normalization. The Realtek HD manager can equalize the volume of different tracks. Often songs from different albums have different volume levels. The application will help bring the volume level to a common denominator.
Realtek HD is an excellent application for a computer that allows you to achieve high-quality sound from the built-in sound card (as far as possible). The program is completely free and is distributed by the manufacturer along with drivers. That's why it is very popular among those who use Realtek equipment.
Advantages
How does Realtek HD stand out from other similar programs? This software product has enough advantages.
- simple and straightforward installation process;
- constant work in the system tray (without special load on the PC);
- a reasonably organized interface without a bunch of unnecessary elements;
- Russian language included;
- adequate work with Windows 10;
- support for 32-bit systems;
- normal operation with Windows XP;
- low demands on system resources;
- ease of use and settings.
Realtek HD Manager is used only on computers and laptops with a built-in sound card from Realtek. On other machines it is completely useless. You need to know this before downloading the installation file. However, if the user has the right card, then the dispatcher can become an indispensable assistant.
Download
Realtek HD Manager can be downloaded from our website via a direct link. All archives have been checked by the best antivirus products. There is definitely no malware.
Realtek High Definition Audio Driver is a package of drivers that allows you to correctly play audio files on operating systems from Windows 2000 to Windows 10.
After installation, the manager appears in the control panel.
The package has the following advantages:
- Sound drivers installed by default in Windows operating systems are unable to run some programs (for example, Skype) in the absence of Realtek drivers. In addition, Realtek allows you to use more careful settings for the highest quality sound output.
- Realtek provides multi-functionality. With its help, you can simultaneously connect either several speakers or headphones with speakers using the Plug and Play system. In addition, there is support for most audio formats.
- Convenient input and speech recognition.
- User-friendly interface. Not every program can boast of a convenient, understandable and pleasant-looking interface for the average user. The advanced equalizer with four tabs stands out separately: “Sound Effect”, “Mixer”, “Sound Inputs/Outputs”, “Microphone”.
- The ability to emulate 26 types of environments for the most effective gaming experience.
- Ability to support microphone and electronic musical instruments.

There are three versions of drivers for audio devices:
- The version is intended for integrated HD Audio in the operating system Windows Vista, Windows 7/8/8.1/10, as well as older operating systems such as Windows 2000/XP/2003.
- A version of the so-called ATI HDMI Audio Device Driver is intended for installation on systems with motherboards based on AMD chips with an HDMI port.
The realtek hd manager driver package is one of the best because it is multi-functional and is supported not only by Windows OS, but also by Linux OS, a direct competitor of the former.
This package supports high-level audio output and has other gadgets for convenient work with audio files.
If you have it at the wrong address “Start -> Control Panel -> Realtek HD Manager”, then you need to reinstall.
Download Free High Definition Audio Codecs Pack, without registration and SMS, you can follow the links from the table.
Or you can go to the office. website link http://www.realtek.com/downloads/ and select High Definition Audio Codecs(second link). Then check the box to agree to the requirement. After this, a sign will appear in which you can select the appropriate version of Windows (32 bit or 64 bit). Here's so you don't get confused.
UPD: the links on the official website have changed, the screenshot is out of date.
Realtek HD Audio Manager helps with setting up your audio device and makes it easier for low-end PC users. It helps you set up sound playback in the pitch and key that suits you. Realtek Manager makes setup easy and monitors driver updates for your sound card. In this article we will take a detailed look at the installation of this manager from the official website of the Realtek Company. Attention! The site exists only in English, Chinese and Japanese.
Download Realtek HD Manager from the official website for Windows-7
Open the official website of Realtek http://www.realtek.com.tw/, here we look for the tab “ Downloads» (« Download") and go to it.
The installer file we need is called " High Definition Audio Codecs"To find it, click on " Computer Peripheral ICs" on the left side of the page, select the first sub-item: " PC Audio Codecs" Next, look for the name of our program and click on it.

The next page includes three items with data and files for our Dispatcher. Since we need an installation snail, click on the item “ Software" This is where all boot data, drivers and utilities are located.

Before you can access the list of downloadable files, you must accept the agreement. To do this, check the box “ I accept to the above" and press the button " Next».

Now you have reached the main page - files for various operating systems are located here. Find your OS, taking into account its version and number of bits. In our case, this is Windows-7 64bits or 32bits (x86). To start downloading the installer, click the “Global” button.

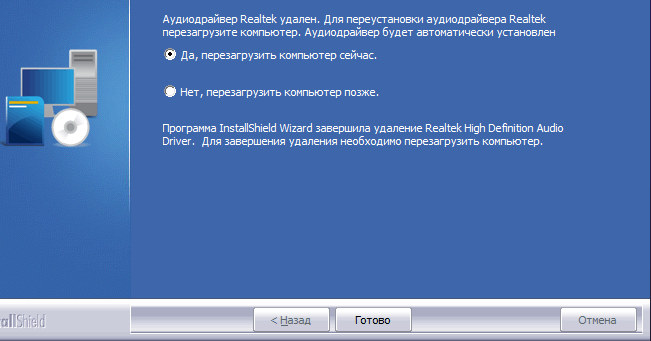
Once the download is complete, launch the snail. First, the program will remove the sound drivers from your computer, so during installation the sound will not play, and there will be a cross on the speaker icon in the tray.

Removal will not take much time, but upon completion you will need to restart your computer. Select the required item and click " Ready».
After rebooting, the installer will start automatically. Now you must confirm your consent to install new drivers and Realtek Sound Manager.
Once the installation is complete, you will have to restart the computer again to apply the changes to the system.

After the second restart of the computer, the standard sound icon will change to the Realtek icon, and when hovered over, the name “ Realtek HD Manager" To open it, it is enough left-click on the icon. It has many customization options and is also ideal for installing new equipment (speakers, headphones).

The manager checks for driver updates for your audio devices, ideal for both personal use and for studio and concert sound design. Be creative when it comes to sound design, highlight what you need most – vocals, music, bass. Good luck!
A complete description of the parameters, as well as instructions for setting up built-in Realtek sound cards. Setting up playback, recording, 3D sound. Windows Vista/7/8
2012-02-17T18:19
2012-02-17T18:19
Audiophile's Software
Copyright 2017, Taras Kovrijenko
Full or partial copying of the text is allowed only with the written permission of the author.
Prologue
This time I will touch on a topic that is relevant, so to speak, for beginner enthusiasts - that is, for those who have not yet acquired a discrete sound card and want to get the most out of an integrated one.
1. Educational program
To begin with, a short educational program. Who doesn’t know or doesn’t fully understand what it is hardware audio codec, carefully read the relevant Wikipedia pages:
Have you read it? Great! And now it would be very nice if you read my two articles:
Well, now we can start.
2. What do we have
So, I have at my disposal the Windows 7 SP1 Ultimate x64 OS (the setting described in the article is suitable for all operating systems starting with Vista), the ALC887 codec built into the motherboard (ASUS P7H55-V) (there is a datasheet), an external amplifier connected to the rear connectors and microphone (green and pink sockets, respectively). Please note that we will configure the card for withdrawal stereo sound by analog interface.
3. Software installation
First of all, you need to install the drivers. Of course, most likely the Windows OS itself has already found and installed the drivers for the sound device, however, to gain access to all the functionality, as well as for peace of mind, we will install the driver package directly from Realtek, the latest version of which you can download on the corresponding page of my website. By the way, the settings specified here were tested on driver version R2.67.
Download the drivers and perform a simple installation procedure (by running HD_Audio/Setup.exe), reboot the computer.
After loading the OS, a brown speaker icon should appear in the system tray:
4. Driver setup
First of all, let's go to Windows Control Panel->Hardware and Sound->Sound and, making sure that our headphones or speakers are connected to the green socket of the sound card, we disconnect all unnecessary devices, and make our connected device the default device:

At the same time, let's do the same with recording devices:

Now double-click on the tray icon. If there is no icon, look for it in hidden icons; if it’s not there either, go to Control Panel->Hardware and Sound->. One way or another, the dispatcher window should open:

Here we immediately set the speaker configuration (stereo), set our analog device as the default device (after which the corresponding button will go out), turn off surround sound if, God forbid, it’s turned on.

Using the button in the form of a yellow folder, you can configure to disable detection of front panel connectors:

Also note that the connected connectors are displayed in bright color - in our case, speakers are connected to the green output, and a microphone is connected to the pink input. There is one very important detail here: by double-clicking on the connector icon, you will see a window with a choice of the type of connected device. This is important because if you choose "headphones", then the codec will use a special additional amplifier (otherwise the sound in the headphones will be too quiet), but for connected active speakers or external amplifiers you should select "Front Speaker Output". Here you can enable the automatic pop-up of this window when you connect a device to any of the card connectors:

Using the “i” button, you can open a window with information about the driver version, DirectX, audio controller and codec version, and you can also turn on/off the display of the icon in the system tray:

Now let's turn off the effects:

The “Room Correction” settings for the stereo configuration are not available, which is strange - in the same console from THX (which is included, for example, in the Creative X-Fi driver package) you can adjust the distance and angle of direction of the speakers relative to your location, which It can be very useful when you are not sitting directly in front of the speakers, or they are located asymmetrically relative to you. Well, okay, let it be on the conscience of the developers.
The last tab duplicates the control panel settings (however, most of the settings from the Manager are also in the control panel):

Here you can set the parameters of the system mixer - at what sampling frequency and bit depth Windows will mix all played sounds. Let's set it to 24 bit, 96 kHz. I’ll tell you why later.
Since I am constantly bombarded with questions about how to set up a microphone (which, in my opinion, should cause a minimum of confusion), I will still focus on setting up recording devices. Their settings, by the way, as well as playback devices, are located on separate tabs at the top of the window. Let's start with the stereo mixer:

Everything here is elementary. This device records everything you hear through the speakers, that is, the finished audio stream that Windows transmits to the sound card. It is reduced to the specified form (since the mixer operates with a sampling frequency of 96 kHz, then we will set the same here).
But our main recording device is, of course, the microphone:

So, set the recording volume to maximum and turn off the microphone gain (then, if necessary, you can turn it on). Also, very often people complain that they reproduce the sound picked up by the microphone; to prevent this from happening, we turn off the playback. To your taste - noise filtering, echo suppression. On the tab , again, the recording format is set:

Considering the characteristics of the sound recording path, the standard 16 bit/44.1 kHz will suffice here.
5. Setting up foobar2000
In principle, the work done is enough to ensure the highest (for this card) sound quality in any player. But for the truly paranoid, I will provide foobar2000 settings. We will need, in fact, the player itself and several plugins for it - WASAPI output support And SoX Resampler. Well, or you can download my assembly, which already has everything.
So, in the player output settings (File->Preferences->Playback->Output) select WASAPI:<наше устройство>
, set the bit depth 24 bit:

When outputting through WASAPI Exclusive, all sound card effects (if enabled) are bypassed, as well as the Windows mixer (for which we specified the sample rate).
Now let's move on to the DSP settings:
 Here we add the resampler SOund eXchange and Advanced Limiter to the chain. In the resampler settings, set the frequency to 96 kHz.
 Now why 96 kHz? I conducted a series of experiments and this is what I found out. In Front Output mode, if the volume control is set to more than 90%, when playing the test tone udial(sampling frequency - 44.1 kHz) strong distortion is heard. The distortion disappears if you either lower the volume, switch to headphone mode, or resample the audio to 96 kHz.
It is difficult to judge the reasons for this phenomenon based on the available data, but you can draw conclusions and play it safe twice: output all audio at a sampling rate of 96 kHz, and do not increase the volume to more than 90%.
And a few words about the need to configure foobar2000. In principle, it is possible to output sound to the "DS: Primary Sound Driver" device. In this case, resampling will be performed using Windows (the resampler there is not the worst), and all other sounds will not be turned off (as when playing through WASAPI Exclusive). In addition, by selecting this device, Windows will output sound to the device that is installed by default in the Control Panel, which can be convenient (for example, when you turn off one of the devices, the sound automatically switches to another). So the choice is yours - convenience, or confidence in quality.
6. Resurrecting 3D Audio and Hardware Mixing
And of course I haven’t forgotten about gamers. Since in Windows, starting with Vista, there is no access to hardware mixing of streams (all operations are performed by Windows, and then one single stream is output to the sound card), the developers came up with a special program, analogous to Creative ALchemy, but for Realtek - 3D SoundBack. It connects to hardware resources via the OpenAL interface, emulating for the specified Windows programs, emulating a DirectSound device (as in Windows XP), and then simply converting DirectSound (or DirectSound 3D) commands into OpenAL commands, resulting in real EAX 2.0 in games, as well as the ability to convert multi-channel audio to stereo with surround effects.
To launch the program, open the folder .../Program Files/Realtek/3D Sound Back Beta0.1, in file properties 3DSoundBack.exe on the tab "Compatibility" install Windows Vista SP2 compatibility mode:

Now run this file. To add an application - click Add Game, enter the name and address of the folder that contains the executable file of the program. For example:

After adding, do not forget to highlight the added application and click the button Enable.
Now the specified application will by default use the DirectSound emulated device and will have access to the hardware resources of the sound card:

Epilogue
Well, another great article is completed. By the way, I was thinking: in a good way, this article should have been written one of the first... However, at that time I still would not have had enough knowledge to describe everything in such detail, so it may be to the best.
If something is unclear, or you have any questions, please ask or comment. Good luck!
Information from the sponsor
EuroTekhnika: a chain of household appliances stores. On the website http://euro-technika.com.ua/ you can familiarize yourself with the range of modern 8-core smartphones (using a convenient catalog) and place an order here (with delivery or pickup).
Publications on the topic
-
 How to find out and increase traffic to a VKontakte page
Every novice webmaster in the field of Internet marketing faces a difficult problem - how to increase website traffic? To the young...
-
 Selling structure of the marketing whale
A marketer tells and shows with specific examples how to create a competent marketing kit, what elements should be there and why...