
How to create a theme. Editor program for changing and creating Windows themes How to create themes for Windows

Windows 7 has a very beautiful mode for changing desktop wallpaper in slideshow mode. However, after a few months, I got bored with the standard themes, just as I got bored with . And I was puzzled by creating my own Windows 7 theme, with my own photos, colors, etc. And everything turned out to be much simpler than you might think at first.
The themes themselves are stored in a file with the extension “.themepack”, which is a regular cab archive. Actually, here is a description of its structure:
Of course, it was possible to generate this file yourself, but I was somehow lazy, and I decided to look for a simpler way, for example, using some program. But it turned out that Windows 7 itself can create these files. Below I provide step-by-step instructions on how to do this.
1. Preparing photos for a future Windows 7 theme
Select the necessary photos: they must have a resolution no less than the resolution of your screen, for example, 1280 x 1024. If the photo size is smaller, the photo will begin to “stretch” and “blur,” which is very ugly. Moreover, it’s very good to first add sharpening photos using a graphic editor (Photoshop or a free one) - it looks very impressive.
Copy all the photos into a separate folder in “My Pictures” so that they will be easier to select in the next step. If the order in which photos are displayed is important to you, rename them so that they appear in the order you want when sorted by file name.
2. Specifying Slideshow Photos in Windows 7 Theme
Right-click on an empty space on your desktop and select the “Personalization” menu item
Click on "Desktop Background"

Specify the location of your photos and tag them:

Specify the mode for changing photos:

3. Saving the theme in a .themepack file
But now that’s really all! The resulting file can be published somewhere on the Internet and enjoy its downloads, which can be monitored using Google Analytics, but that’s a completely different story...
Many who have installed Windows 7 cannot get enough of the Aero interface. How to make your own theme in Windows 7?
Everything is very simple - I would even say intuitive, since I did it myself 3 minutes after I set out to make my own theme.
To make it clearer, I will make instructions in pictures; I think the fact that I speak English in Windows will not hurt anyone. In other languages, everything is similar.
1. Right-click on the desktop and select Personalize.


3. A background selection window will open. Uncheck unnecessary photos. And if necessary, use the Browse button to select the folder with the photos that you want to add to the theme. It is optimal that the photos have a resolution of at least 1024 by 768. Jpeg format. Photos from 5-8. This is if you are going to post the topic on the Internet. If you are making a Windows 7 theme for yourself, then do it as you please. At the bottom, don’t forget about the checkbox - display options: randomly or sequentially. You can also select the location of the background image - the default is usually the optimal value (stretch the image).

4. Next, save changes. You will again see the window from step 2. Select Windows color - this is essentially the theme color. You can choose a color from those suggested or make your own shade. Plus choose your transparency.

5. Next, save changes. You will again see the window from step 2. Select Sounds. I won’t go into details on how to make my own sound scheme. You can select from the suggested ones in the drop-down list.

6. You can choose a screensaver for the theme, but I don’t think it’s necessary to choose it at all, except perhaps for a black screen. Therefore, we will safely omit the Screen Saver item.
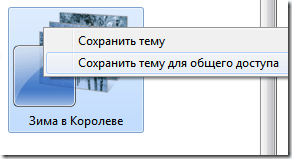
7. Next we will see that the theme is already in the My Themes section and it is written that it is not saved (Unsaved Theme). Right-click on it and select from the drop-down list: the first item Save theme, if we just want to save it on our computer (just enter a name). Or select: second item Save Theme for Sharing to save the theme to a file.

In Windows 7, it became possible to create your own themes and automatically change the background of the login screen. The theme you create can include the following components:
screensavers,
desktop backgrounds,
color and transparency level of the taskbar and dialog boxes.
There are options to create slideshows from background images and change the background of the login screen when switching themes.
Appearance Options
So, right-click on an empty space on your desktop and select Personalization. In the window that opens (Fig. 1) you will see three categories:
My topics
Aero Themes,
Basic themes.
When installing themes that contain your own visual style, a fourth category will appear - Installed Themes.
Below are the settings for creating your own theme:
- There can only be two login backgrounds - the built-in one and yours. That is, for three design themes it will not be possible to create three entrance backgrounds.
- If there are several accounts in the system and each has its own theme and login background, then the login screen of the account whose owner last applied the theme will be displayed.
Desktop background,
Window color,
Picture 1
As you can see, there is no setting to bind your cursors to a theme. This happens in a slightly different way, which will be discussed below.
Setting the window view
By default, the already configured Aero theme is installed (Fig. 2). Click Desktop background at the bottom of the window.
Figure 2
After configuring these settings, click Save changes and you will be returned to the main window. Now click Window color, and the following dialog will open (Fig. 3).
Figure 3
There are already preset colors (1), but using the sliders (2) you can choose exactly the color and transparency that you need.
To fine-tune dialog boxes, click Additional design options, and go to the next dialog in which using the settings Element, Font, Dimensions And Colors You can specify additional options for your theme. After customizing the appearance of the windows, click OK.
Setting up the sound
Figure 4
You can customize your own sounds for each of the Windows events. If you have your own pre-configured and saved sound scheme, simply select it from the list and press the button OK.
Screensaver selection
Figure 5
Click Screensaver(Fig. 5), and after selecting the screen saver, click OK.
Setting up cursors
There is no separate setting for cursors, but the saved theme includes the currently installed cursors.
The situation with cursors is the same as with the sound circuit. If you have a pre-configured scheme, install it before saving the theme and your cursors will be added to the theme automatically. To enable cursors to work in conjunction with the theme, select the checkbox Allow themes to change mouse pointers and press OK(Fig. 6)

Figure 6
Saving a theme
After completing the theme setup, the main window will display Unsaved topic(Fig. 7).

To save a theme for personal use, select Save topic. In this case the file Your theme.theme will contain only a description of your settings and will be saved in the folder C:\Users\Username\AppData\Local\Microsoft\Windows\Themes.
You can also choose Save topic for sharing. Then the file will have the format Your theme.themepack and saved in the location you specified. It will contain all your customized settings (wallpapers, sounds, cursors, etc.) and can be published online and installed on other computers.
Automatically change the background of the login screen when you change the theme
For the first time in the history of the Windows operating system, Microsoft developers have included such an interesting option as automatically changing the background of the login screen when the theme is changed! Previously, for example in Windows XP, this required third-party programs.
First you need to make a background image for your login background option. The file must be in JPG format, match the resolution of your monitor and be no more than 256 KB! You can convert a drawing to this format, for example, using the free program FastStone Image Viewer. The prepared file must be renamed to backgroundDefault.jpg and save to a folder C:\Windows\System32\oobe\info\backgrounds(you need to create it).
The next step is editing in Notepad your theme file Your theme.theme. This is a text file, but with a different extension, so open Notebook and drag the theme file into the Notepad window. The beginning of the open file will look like this:
; Copyright Microsoft Corp. ; Windows 7 - IDS_THEME_DISPLAYNAME_AERO DisplayName=Your_theme_name SetLogonBackground=0
Parameter SetLogonBackground=0 tells the system to use the default login background. We need to change 0 on 1 to use your login background with this theme. Edit and save the file. Now everything is ready.
To check the results of the changes, enable your theme and use the menu Start - Shut down - Change user check your login background. Then switch to the Aero theme and check again. Happened? So you did everything right!
Notes:
Ready-made themes can be downloaded from the Microsoft website
Conclusion
This article walks you through the step-by-step process of creating your own theme by enabling a hidden option to automatically change the login screen background when you change the theme.
Windows 7 has a very beautiful mode for changing desktop wallpaper in slideshow mode. However, after a few months, I got bored with the standard themes, just as I got bored with the Windows 7 themes from the Internet. And I was puzzled by creating my own Windows 7 theme, with my own photos, colors, etc. And everything turned out to be much simpler than you might think at first.
The themes themselves are stored in a file with the extension “.themepack”, which is a regular cab archive. Actually, here is a description of its structure:
Of course, it was possible to generate this file yourself, but I was somehow lazy, and I decided to look for a simpler way, for example, using some program. But it turned out that Windows 7 itself can create these files. Below I provide step-by-step instructions on how to do this.
1. Preparing photos for a future Windows 7 theme
Select the necessary photos: they must have a resolution no less than the resolution of your screen, for example, 1280 x 1024. If the photo size is smaller, the photo will begin to “stretch” and “blur,” which is very ugly. Moreover, it’s very good to first add sharp photos using a graphic editor (Photoshop or free Paint.Net) - it looks very impressive.
Copy all the photos into a separate folder in “My Pictures” so that they will be easier to select in the next step. If the order in which photos are displayed is important to you, rename them so that they appear in the order you want when sorted by file name.
2. Specifying Slideshow Photos in Windows 7 Theme
Right-click on an empty space on your desktop and select the “Personalization” menu item
Click on "Desktop Background"
Specify the location of your photos and tag them:
Specify the mode for changing photos:
3. Saving the theme in a .themepack file
But now that’s really all! The resulting file can be published somewhere on the Internet and enjoy its downloads, which can be monitored using Google Analytics, but that’s a completely different story...
All sections of the site site
What is a theme + customize Aero for Windows 7
Customizing the Windows 7 Theme
What is a theme?
A theme is an amalgamation of computer images, colors, and sounds. It includes a desktop background, splash screen, window border color, and sound scheme.
Some themes may also contain desktop icons and mouse pointers.
Windows comes with several standard themes.
You can choose the Aero theme to customize your computer, the Windows 7 Simplified theme if your computer is running slowly, or the High Contrast theme to improve the visibility of elements on your screen.
Click a theme to apply it to your desktop.
Theme contains desktop background, screen saver, color
windows and sounds.
Open the "Personalization" section. To do this, click the Start button and select Control Panel. In the search box, type personalization and then click Personalization.
You can also change the images, colors and sounds individually to create a customized theme. See below for more information
Creating a Windows Theme
You can change individual parts of a theme (images, colors, and sounds), and then save the modified theme for your own use or to share with others.
Changing Theme Components:
2. Click the theme you want to change to apply it to your desktop.
3. Do one or more of the following:
3.1. To change the background, click Desktop Background, select the check box for the image you want to use, and then click Save Changes.
3.2. To change the color of window borders, click Window Color, click the color you want to use, and then click Save Changes.
3.3. To change sounds for a theme, click Sounds, select an item from the Sound Schemes list, and then click OK.
3.4. To add or edit a screensaver, click Screensaver, select the Screensaver list item, change any options you want, and then click OK.
The modified theme will appear in the My Themes section as an unsaved theme. Saving the modified theme for your own use only
1. Open the “Personalization” section. To do this, click the Start button and select Control Panel. In the search box, type personalization and then click Personalization.
The theme appears in the My Themes list. Please note that this method of saving themes does not allow them to be shared with other users.
===================
 ================
To save a modified theme to share with other users:
To share a modified theme, follow these steps:
To distribute the topic you can use
email, network or external hard drive.
1. Open the “Personalization” section. To do this, click the Start button and select Control Panel. In the search box, type personalization and then click Personalization.
2. Click the modified theme to apply it to your desktop.
3. Right-click the theme, and then select Save Theme for Sharing.Customize the Windows 7 Theme
What is a theme | configure Aero in Win7 create a theme)
Publications on the topic
-
 Using the converter “Levels in dBm (dBm or dBmW), dBV (dBV), watts, etc.
On many forums people ask the question: how to convert from dB to dBm? As shown above, the advantage of the logarithmic scale is obvious in...
-
 Lamoda order shelf life
Girls, who ordered from Lamoda. How long is the average order? Mine was simply transferred to the Pony Express delivery service on 10/24, but I haven’t heard anything from them...