
Publications. Publications Thin client 1s file

The release of versions 8.2 and 8.3 of the 1C:Enterprise program marked a major leap in the development of system architecture. Among other things, this manifested itself in the ability to choose the type of client. Let's look at the differences between “thick” and “thin” clients in 1C.
The differences in data display are in the form of the client-server system.
Program architecture
The 1C system is built on a client-server basis. The term client is commonly understood as a set of user-oriented consumer applications. The concept server refers to the service part in 1C, which is hidden and independent of the user. The client-server system can be represented by different types. Thus, “thick” and “thin” are different types of client-server system. The time has come to consider their differences.
Meet the fat client
What is "fat"? - This is a common type of application that we have been working with in 1C since the days of 7.7. In 1C 8.0 and 8.1 it remained the same. It is characterized by the fact that the server itself, information processing, temporary files, cache - all this is located on the user’s computer. This ensures its full functionality and independence from the Internet.
And it is called thick because to process these powerful processes, powerful data channels are needed - thick (meaning bandwidth). And the exchange takes place via the TCP/IP protocol. Before the advent of 8.2, he was the only type for odoneski work. It is characterized by difficulty in installation and high cost.

IMPORTANT. Development of application solutions in the configurator is available only from this client.
Selecting a thin client
In 1C, the thin client appeared with version 8.2. Operating in this mode is called application-driven. In practice, this manifests itself in the fact that all information processing processes, data, temporary files, query execution, cache - all this is already located on a remote server, access to which is practically limited. And the result (ready data) is displayed on the user’s monitor.

An example of this would be working with some kind of web application. When using such a client, increased system resources and exchange channels are not required - these channels are already thin (designed for a smaller flow). Installing the distribution is simple and does not take up much space. On the one hand, it allows you to work with 1C via the Internet, on the other hand, it only supports user mode, depriving you of the use of the configurator.
Now you know what the differences are between the 1C thick and thin clients and you can choose the best version of the client server for your enterprise.
Many people are familiar with the name 1C, but not everyone understands exactly how it works. 1C: Enterprise is a software product that was originally developed to automate accounting. Today it is used to operate the entire enterprise. There are several options for interacting with the database; in this article we will look at the differences between the 1C thick and thin clients.
Fat client - a long-familiar work option
The original type of program viewing that existed in 1C: Enterprise from the very beginning is called thick. Before version 8:2 it was the only one, but now it is considered the simplest possible. It is worth noting that the application in question lives up to its name. Its functionality includes almost all possible commands, but it requires very good network speed and fairly large computer resources. This is explained quite simply: the thick client processes most programs in the built-in 1C language on the user’s computer.
How the thick client works:
- First, data is requested from the server;
- The 1C server sends a request to the database;
- The information is sent to the user's application;
- The information is then processed.
Thin client - a modern way of working
Introduced in the latest update, the slim app is radically different from its predecessor. Now users can work from home without wasting extra bandwidth or overloading their personal PCs. This change is caused by some change in concepts about how such work should be carried out. The requested processes are processed not on the user's computer, but on the server computer, which then sends the received data to the requester. It turns out that users can breathe easy, but how can they find a device that can cope with the work of an entire huge enterprise? The manufacturer has also provided for this issue - the server can be divided into several computers, obtaining as much machine power as needed.
This is what the algorithm looks like:
- First, it sends a request for the necessary information;
- The server communicates with the database;
- 1C server processes the received data;
- The server sends the requested information to the user.
The information received is enough to understand that there are differences between the applications, so it would not be superfluous to familiarize yourself with such descriptions before starting work.

Does it make sense to use a thick client?
As already mentioned, many users do not want to accept innovations and remain faithful to the old application. But is it just a matter of devotion? No and no again.
Whenever possible, you should connect through a thick client. Today its functionality remains the most extensive and convenient. For example, the 1C configurator works only in the old version, and the file database is accessed exclusively through the “thick” version of the client application.
But no one argues that the idea of a thin client sounds tempting, and everyone will benefit from the full implementation of this idea, especially large enterprises for which all this was conceived. Rumor has it that in the coming years the entire software product will be transferred to a new client, but no one is talking about the fate of Tolstoy. Perhaps it will go down in history as unnecessary, but at the moment the time has not yet come to get rid of such convenience.
for platform 8.2:
for platform 8.3:
Comment. Automatic updating of a thin client under Windows XP and Windows Vista via 1C:Link may not work. This is not very convenient and we recommend that you consider upgrading to a more modern operating system.
Configuring the 1C Thin Client to work with the 1C: Enterprise 8 platform version 8.3.4.437 and higher
Install the root certificate of the 1C: Link service in the Windows certificate store according to the instructions for the Internet Explorer browser.

https://<ваш-сайт>.link.1c.ru/xxx

Select "Windows Certificates" as the method to verify the server certificate.

Click "Done"

Setting up automatic authorization on the web server
- Select the required information security in the 1C Thin Client and click the “change” button
- Click on the "Advanced" link (located under the infobase address field)
- In the "Select a web server user authentication method" section, select "Select automatically" and click "Next".
- In the certificate settings window, click "Next".
- In the "Additional launch parameters" section, specify the line: where login is the web server user login, and password is his password.
Click the "Finish" button and check the connection to the infobase.
Read more about the Thin Client settings on the ITS website.
Configuring the 1C Thin Client to work with the 1C: Enterprise 8 platform version 8.2.19.121 and higher
To work in a thin client, download . Save instead <1C>\bin\cacert.pem , where<1C> - installation directory of the 1C Thin Client. This will prevent the SSL error "Peer certificate cannot be authenticated with known CA certificates" from appearing.

Enter the name of the infobase, select "Web server" and click "Next"
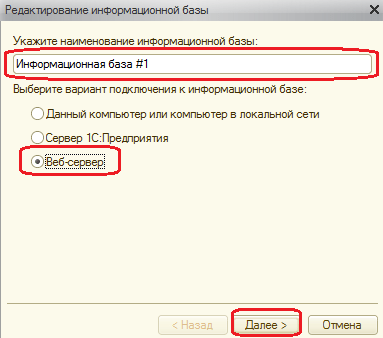
Enter the address of your infobase: https://<ваш-сайт>.link.1c.ru/xxx,where xxx is your web application path.

Click "Done"

Configuring the 1C Thin Client to work with the 1C: Enterprise 8 platform versions not included in the list of recommended ones
If you want to use a thin client version different from those recommended above to work in the 1C: Link service, you may need to configure the work according to HTTP or installation STunnel.
Configuring the Thin Client to work via HTTP
The Link Agent has the ability to work in a thin client using the HTTP protocol. However, the preferred protocol for working in a thin client via 1C:Link is HTTPS. It is not recommended to use the http protocol, since when used, data is transmitted unencrypted and can be intercepted by an attacker.
If you are sure of the need to use this protocol to work in a thin client through the 1C:Link service, you can use the instructions presented below:
Open the link agent control panel and enable work via HTTP (section 4.4 of the 1C:Link user manual).
Set up the thin client:
Launch the thin client and click the Add button.
Enter the name of the infobase, select "Web server" and click "Next"
Enter the address of your infobase: http://<ваш-сайт>.link.1c.ru/xxx,where xxx is your web application path.
Click "Done"
Installation and configuration of Stunnel
Install the Stunnel program on a computer with a 1C Thin Client. After installing the program, run it.
In the window that opens, select "Configuration"

In the drop-down menu, select "Edit stunnel.conf"

Notepad will open with the configuration file. Replace the text in the file with the following lines.
2016-12-07T18:05:29+00:00Many 8 users have already heard terms such as “Thick client” and “Thin client”. But few people know what this means.
Fat client- This is the normal way to work with the program. We have long been accustomed to it (since the days of 7.7 and 8.2). In details .
Thin client- this is the 1C launch mode for working via the Internet, when the accounting database is not on our computer or even on our network, but somewhere thousands of kilometers away on a remote server (possibly in another city or country). In details .
Simply put, for an ordinary accountant who works with a database directly on his computer or on an enterprise network, there is no difference between a thin and a thick client.
But it often happens that some errors appear in one client and are absent in another. As, for example, with displaying transactions in 1C Accounting 8.3.
In this case, it can be useful to find out which client we are currently working in and change it to another.
How do you know which client you are working with? Look at the window with the version of your 1C (at the article):
There, in the “Application” section, your client will be indicated:

It is written about how to change a client.
Sincerely, (teacher and developer).
Users of the service can work with applications not only in a web browser, but also in the 1C:Enterprise thin client.
This article will tell you how to install and use a thin client on a computer running the Windows operating system.
1. Determining the required version of the thin client
First you need to determine which version of the thin client you need.
2. Download the thin client
Download the required version of the thin client. Here are links to download thin client installation programs for those used in the service website versions of the 1C:Enterprise 8 platform and various versions of Windows:
A 64-bit thin client should only be installed if recommended by your service organization or service support line.
If the Internet browser does not ask where to place the downloaded file, the file will be saved in the folder designated in the default browser settings. Typically this folder is called Downloads or Downloads.
Automatic updating of the thin client under Windows XP and Windows Vista does not work. Therefore, you will have to install a new version of the thin client every time you update the version of the 1C:Enterprise platform in the service. This is not very convenient and we recommend that you consider upgrading to a more modern operating system.
3. Installing a thin client
Install the thin client using the downloaded installation file:

4. Setting up the thin client
For the convenience of working with the 1C:Enterprise 8 thin client, it is recommended to enable the mode for displaying a list of infobases in the form of a tree (this only needs to be done once):
- Launch the thin client.
- Click in the window Launch 1C:Enterprise button Setting...
- Check box Display as a tree.
- Press the button OK.
After this, the group will be located in the list of thin client infobases website with points.
Publications on the topic
-
 How to promote Instagram: the best methods of promotion and a step-by-step plan for promoting your account yourself Paid methods for promoting Instagram
The number of Instagram users today is 130 million active users, billions of new likes are being added...
-
 What is the difference between SEO promotion and contextual advertising?
Marina Khalilova VKontakte If a site is in the top of search queries, what difference does it make how it got there? SEO or contextual advertising?...