
Enable atx without a computer. Using a computer power supply without a PC. What to do if the power supply does not turn on

It happens that it becomes necessary to turn on the PSU (power supply) of the computer without the participation of the computer itself, or more precisely, without connecting to the motherboard.
Basically, this need arises when, for example, it is necessary to check the health of the power supply or in order to power some device with a voltage of 5 V or 12 V.
I once had to use an ATX power supply as a power supply for my D-Link modem.
You can also use the ATX unit as a power supply for an old radio and for much more.
Turning on the power supply without load
I will describe two options.
First way
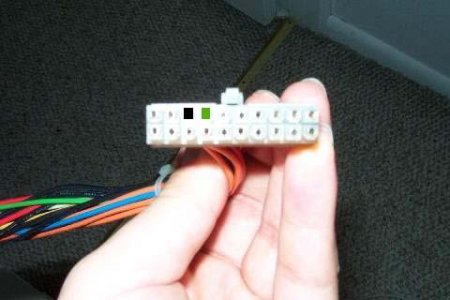
In order to start the ATX unit, you simply need to short-circuit the green and any black wires on the power supply connector (PS-ON and GND pins, respectively, see the figure below).

This is what it looks like in real life:

It also happens that on some power supplies these wires may be of different colors (you understand - the Chinese), so I recommend taking a closer look at which wire you have as the PS-ON output.
Second way
If you don’t have a piece of wiring at hand, then the same steps can be done using a regular paper clip. We close all the same colors of wires.
Read also:
Why can't you turn on a computer power supply without a load?
Now a few precautions.
If you don't do this, the voltage conversion circuit may fail and require an expensive ATX power supply repair, and maybe its complete replacement due to the economic irrationality of repairs.
By the way, it happens that some power supplies simply may not start without load.
When purchasing a computer, most users first of all pay attention to components such as the processor, RAM, video card and hard drive. There are many programs designed to test these devices, which are widespread even among beginners. At the same time, few people know not only how to check, but also how to start the power supply without a computer. But this is its most important component, without which the work of all other elements is impossible. In addition, do not forget that this unit can be used not for its intended purpose, but for example, as a power source for radio equipment, a low-voltage soldering iron, or converted into a charger.
First you need to understand the connectors and color marking of the power supply pins. If you look at the many multi-colored wires coming from the power supply, then, at first glance, the question of how to start a computer power supply without a computer seems insoluble without the help of a qualified specialist. In part, this is correct. Incorrect actions may result in damage to the device and/or electric shock. But, everything is not so complicated, the main thing is to understand what the power supply connectors and wires of different colors are intended for.
Modern ATX standard power supplies are equipped with one 20 or 24-pin connector that serves to supply power to the computer motherboard. Often there is a universal connector that has a main 20-pin part and an additional part with 4 pins attached to it, which allows the power supply to be used to power both outdated and new computer models. It is this plug that we will need to solve the problem of how to connect the power supply without a computer.
Flat 4-pin white connectors are used to connect hard drives and DVD drives, supplying the main supply voltages +5 V and +12 V. Recently, they have been replaced by miniature black SATA connectors, which also contain + 3.3 voltage B. Other plugs, similar in appearance to the connector for connecting power to the motherboard, but having a smaller number of pins (2,4 or 6), are used to supply additional power to the processor and video card. All the connectors listed in this paragraph are of interest to us only from the point of view of receiving one or another supply voltage.
Let's list what this or that wire color means:
- Black - common wire (GND);
- Orange - +3.3 V;
- Red - + 5.0 V;
- Yellow - + 12.0 V;
- Green – conductor that turns on the PC (PS-ON).
The power supply also contains a number of wires with other colors, which are not of interest to us in the context of the problem under consideration. Note that the green color is the only wire connected to the 20 or 24-pin power connector of the motherboard.
How to start a computer power supply without a computer
Important: Any switching power supply, such as a computer power supply, must not be turned on without load. As such, you can use an old but working hard drive or CD-ROM.
Startup order:
- We connect the load (HDD, CD-ROM or other device);
- We find the only green wire (PC-ON) on the 20 (24) pin connector;
- We study the location of other contacts and select one of the black wires (GND or common) with which it will be more convenient to connect the green one;
- We make a jumper, which can be a piece of wire or a paper clip;
- We close the contacts;
- We supply mains voltage to the power supply.
If everything went well and the unit is operational, the fan should start working, and the voltage corresponding to their color will appear on the conductors.
Note that it will be much easier to launch an outdated AT format power supply. Such power supplies were turned on using a conventional 4-pin mechanical switch connected to a thick four-core wire, which is absent from the ATX power supply. The connection diagram, as a rule, was indicated on a sticker on one of the sides of the device.
If you still don’t understand the method for starting a power supply outside of a computer, just watch the visual video below and you’ll finally understand everything:
That's all for the question of how to start a power supply without a computer. In essence, everything is very simple, and, without going into details, it boils down to the fact that you need to short-circuit the green and one of the black wires. The main thing is to follow safety precautions and not try to turn on the device without load, which may lead to its failure.
If suddenly your computer stops responding to the power button, then the first place to start looking for the cause is the power supply.
So, the first thing to do is turn off and completely disconnect the computer by unplugging the plug from the electrical outlet.
Location of the power supply in the computer case
To check it and for your convenience, you can unscrew it and put it on the table, but you don’t have to do this. Everything we need to run it without a motherboard is readily available.
Now you need to disconnect two connectors from the motherboard. The first one is 24 or 20 pin.

24 pin power connector
The second is 4 or 8 pin, going to power the processor.

4 pin processor power connector
It is also better to disconnect the power connectors of the hard drives and if there is additional power for the video card.
Important! If you have a disk drive, then you do not need to turn off its power. Since it is highly not recommended to turn on the power supply without load. If you do not have a disk drive, then you need to leave the hard drive power connector.
Now we take the 20 (24) pin connector of the power supply, turning it towards you with the side of the latch with the wires facing up.

After the wire is found, take a regular paper clip and bend it into an arc or a piece of wire with the ends exposed from insulation.
Important! Before the next step, the power cord coming from the socket to the unit must still be disconnected from the power supply.
We connect the 4th contact to the adjacent black one. We get something like this:

Connection of the 4th and 6th pins of the 20-pin power supply connector
If your power supply has a power button on the back near the wire connector, then it needs to be set to the off position (position 0).

Power button on the power supply
Now all that remains is to insert the power cable into the unit and turn on the button. If the fan on the unit starts spinning, then the power supply has started, otherwise the power supply can be considered faulty and the main culprit for the lack of response to the computer’s power button.
Important!
Starting a power supply without a motherboard does not always mean that the power supply is in working condition. Since in this case the load on it is small. 1 hard drive or floppy drive does not even approximate the load that the power supply experiences when turning on the computer. It may be that under a light load the power supply starts up, but under a more serious load it doesn’t.
If you want to check the functionality of the power supply, but you do not have a computer, then there is one way to do this. All you need is a couple of wires and a single-pole switch that stays on or off when changing positions. Below we will tell you how to do this.
Standard ATX power supplies are not designed to idle unless they are properly connected to the motherboard. This ensures that they cannot damage computer components if the connector is not fully connected or is not connected correctly.
Note: Never turn on the power supply without a load! This can lead to its complete failure. The load can be either a resistor or a connected drive, floppy drive, or hard drives.
Another problem is that if you connect the power supply to the mains, it simply does not initialize. It will wait for a startup signal from the motherboard to turn on (usually the signal is controlled by a button on the front of the computer). The article describes the direct initialization of the power supply by closing the corresponding connectors.
Prepare two long pieces of wire to connect them to the switch and the power connector (20- or 24-pin connector).
Strip the insulation from both ends of each wire, leaving enough wire to wrap around the power button (or solder). At the other end, expose a strip sufficient to make sure contact with the 20- or 24-pin connector of your power supply.
Wrap the long end of the bare wire around the switch and repeat the process with the other wire. Set the switch to the "OFF" position.
Turn off the computer's power and remove the power supply connector.
Hold the 20- or 24-pin power supply plug in one hand. Locate the green wire (the ATX motherboard signals the power supply's startup command via "PS_ON#", which is indicated by the green wire). These are pin number 16 on the 24 pin connector and pin number 14 on the 20 pin connector. On the 20/24 pin connector you need to find the black wire (GND). It's usually next to the green one.

Note: Each row has one green wire, it doesn't matter which one you use, they both perform the same function.
Insert one end of the pre-prepared wire from the switch into contact with the green wire. Insert the other wire into contact with the black wire.
Connect the power supply to the network, and then turn the switch to the “ON” position. The power supply will turn on and you can now use it to power devices or for testing purposes.
To make sure the power supply is working properly, you can measure the output voltage using a multimeter. The drawing above shows the output voltage of each pin (+12V, +3.3V, +5V, COM). Pin 13 can be either a +3.3V supply or can be used as a power supply sensor to measure cable loss.
In this simple way, you can easily, and most importantly, safely turn on your power supply without a computer.
Have you often encountered the question of how to start a power supply without a computer? Unlikely, unless you are involved in computer repair at a professional level. Meanwhile, every self-respecting user should know the answer to this, because checking the power supply is the first thing to do when a PC breaks down.
Why is this being done? It's simple, when a computer breaks down, there is a high probability that the reason lies in the power supply. Moreover, even if the unit itself seems to be working, the fan is spinning and the indicator lights are on, this does not mean at all that it is working. This only means that current is entering the power supply, but not that it is leaving it.
To understand whether this is so, you need to check the voltage at its outputs. Doing this while the unit is connected to the computer is extremely inconvenient and dangerous, because frequent switching on can adversely affect the operating system of your PC. In addition, there is always the possibility that a faulty unit may completely burn out, simultaneously damaging other components of the PC. If this happens, it will cost a lot of money to repair your computer, and therefore it is much safer to check the power supply separately from the system.

There are two ways to start a computer power supply without a computer: directly and using a wire. For obvious reasons, the first method is much simpler and clearer, but it only works for old AT standard power supplies. New ATX blocks have a contact that is responsible for turning them on, and if it is not activated, the block will not turn on.
Let's figure out how to use it. To do this you will need a small wire, wire or something to connect the two contacts.
- First, we need to find a 20-pin connector, which contains the coveted contact. It is usually green and is located in the fourth position from the left, counting from the fastening latch. Some manufacturers allow themselves to deviate from generally accepted standards and make wires of a different color, and therefore in a controversial situation it is better to rely on the position of the contact, and not on its color.
- After this, you need to ground your wiring; to do this, connect it to the adjacent contact on the right. If you did everything correctly, the power supply should work immediately.
- Afterwards all that remains is to measure the voltage and power.

Normal power for ATX blocks is considered to be from 250 to 350 W. The voltage can be different: 3, 5 and 15 V. If yours is not the same, then the problem is clearly in the power supply.
How to distinguish an ATX block from an AT standard?
If you don’t want to worry in vain about connecting contacts and how to start a power supply without a computer, then it’s better to immediately find out which standard unit is installed in your PC. There are two simple ways to do this.
The first is to look at the piece of paper glued to one of the walls of the power supply. There, on the very top line, the model number of your unit will be written. The number will begin with either the letters ATX or AT, by which you can understand the standard of your block model.
The second is to look at its motherboard. AT standard power supplies had smooth-shaped motherboards to which six wires were connected.
While the ATX standard motherboard is shaped more like a harmonica and has about twenty wires leading to it.
It is also worth mentioning that for some time models were produced that combine both standards, and therefore have two different motherboards.
What to do if the power supply does not turn on?
The first thing you need to do if your power supply does not start is to check the presence of power at the input, it should be about 220 V, perhaps your cable is simply damaged or the socket is faulty.
If everything is in order, then even if the computer is turned off, the output voltage will be at least 5 V. You can check this by connecting the tester to the ninth pin, which is usually purple.

If you have checked everything, but the computer still does not turn on, then there are three most common problems:
- Open circuit in the power button (you can check by starting the power supply outside the system).
- Short circuit at the output (to check, try temporarily disconnecting all devices and adapters from the PC, then restart the computer).
- Faulty motherboard (an extremely rare case of failure; to check, also start the unit by disconnecting it from the PC; if the unit works, the problem is in the motherboard).
If none of these methods helped you start your PC, then it would be best to contact a specialist, since further diagnostics require certain skills from the examiner.
As you can see, sometimes computer breakdowns happen due to little things that are easy enough to detect on your own. And simple knowledge of how to start a power supply without a computer will help save you time and money.
Publications on the topic
-
 Arduino Uno WiFi: description, characteristics, connection diagram
Ever thought about controlling any electronic devices using your smartphone? Agree, control the robot or...
-
 Homemade frequency meter on ATTINY2313
In this article I would like to introduce you to a “homemade weekend product” - a frequency meter on the already “legendary” ATmega8 microcontroller....