
10 keeps rebooting. The computer restarts when Windows boots. Faulty or insufficient power supply

None of the currently existing operating systems is immune from the occurrence of failures and errors. And Windows tenth version, despite its relevance, is no exception. And one of its problems is that sometimes Windows 10 reboots instead of shutting down. How to fix this problem using various methods, see below.
Instead of shutting down (Windows 10): what's the reason?
Even specialists who know the “ten”, so to speak, inside and out, often shrug their shoulders. The fact is that the true reason for the spontaneous reboot is still unknown.
However, most experts are inclined to believe that this system behavior is associated with NVIDIA video cards (more precisely, with their drivers) and malfunctions of system components in unofficial versions of Windows.

As for drivers, the problem that Windows 10 reboots when turned off can be solved by updating them normally (either in Device Manager or using specialized programs like Driver Booster).
You can also try to remove all devices associated with NVIDIA graphics adapters (monitors, card drivers) and use the “Found New Hardware Wizard” to reintegrate these components into the system. Everything is simple here.
When you turn off your computer, it restarts. Windows 10: Enabling Clean Boot
More complex situations occur when a spontaneous reboot is associated with the incorrect operation of some services and components. If Windows 10 constantly reboots when shut down, first you should pay attention to loading services.

To fix the problem, use the Run console (Win + R), where we enter the msconfig command. Here we select the “Download” tab. In the fields below, you need to deactivate all elements, leaving only the minimum load line active and checking the box next to safe mode. We save the changes and reboot the system.
Disabling startup and service components
If the problem that Windows 10 reboots when turned off remains, then repeat the previous step and look at the “Startup” tab.

If it has any active services, uncheck all processes. But that's not all.

After that, to be completely sure, go to the “Services” tab and deactivate all lines in the same way (you can use the “Disable all” button located at the bottom of the window). We reboot the computer again and look at the result.
Setting up the power supply
If Windows 10 reboots again and again when shutting down, try changing the installed power plan. To do this, you should use the appropriate section in the “Control Panel” (on laptops you can enter it through the context menu, called by right-clicking on the battery icon in the system tray).

Let's move on to the section for setting up buttons and entering a password, where we first deactivate the requirement to enter it when exiting sleep mode, and then uncheck the line for the recommended inclusion of quick startup. Save the changes and try to turn off the computer.
You can use the system registry editor (regedit in the Run menu), where we go down the HKLU branch through the SOFTWARE and Microsoft folders and reach the Explorer section. On the right side we find the CleanShutdown key, double-click to call up the options menu and change the key value to one (the default is zero).
Next, open the HKLM branch and go down the tree to the WinLogon directory. On the right we find the PowerAfterShutdown key and, in the same way as in the previous case, change the key value to one. This will allow you to completely turn off the power when you turn off the computer (even if the cord is inserted into the system unit or into the laptop connector).
Fixing dynamic processor clock incompatibility issue
If all of the above methods do not help, even if they are used simultaneously, the problem may be that Windows is incompatible with the so-called dynamic processor cycles, the processing of which is enabled by default.

To deactivate processing, use the command line (cmd in the “Run” console), where the following is written: bcdedit /set disabledynamictick yes.
After this, we first reboot the system, and then try to turn off the computer using the standard method through the Start menu. If for some reason this service needs to be re-enabled, use the same command, but with the “no” parameter.
Problems with BIOS firmware
Finally, the problem of spontaneous rebooting may be due to outdated firmware of the primary BIOS input/output system. You can try to fix the problem by installing a new version, pre-downloaded from the official developer resource, or at least resetting the settings to default values. However, this situation is extremely rare; in most cases, the methods described above help.
Hello everyone, today I want to know how to solve the problem, namely the constant reboot of Windows 10 after installing the KB3081424 update. Let’s not talk about the dampness of Windows 10, let’s talk about how to solve it, since our task is to restore the system’s functionality and still look at the new capabilities of this OS, to give it a second chance, so to speak.
Update KB3081424 may cause Windows 10 to crash. After installing this update, your computer goes into a reboot loop.
To solve this problem, you need to change the Windows registry. If you don’t know how to open it, then read how to open the registry editor in Windows. In the thread HKEY_LOCAL_MACHINE\SOFTWARE\Microsoft\WindowsNT\CurrentVersion\ProfileList delete settings for non-existing (deleted) accounts.
On the left, you will see a list of profile IDs such as S-1-5-18, 1-5-19 S-, S-1-5-20, including several other names. Search "ProfilemagePath". If any login in the "ProfileList" has a "ProfileImagePath" property, which is not a useful solution, right-click on the profile ID and select "Delete".
In order to find out which profile is yours and which is not, use the command
She will show you your SID

This is how you can easily solve the problem with Windows 10 constantly rebooting after installing the KB3081424 update.
I would like to please you that in the August update, MS assures me that this error has been fixed. Also, for those for whom this did not help, there is another solution to the problem with Windows 10 after the update
Update 11/13/2015
Yesterday, Microsoft posted on its official forums what else could be causing the problem with the start menu; as it turned out, it was the dropbox program. dropbox blocks some files while working. If you remove it, your problem will go away and there will no longer be a constant reboot in Windows 10.
Upgrading to Windows 10 Threshold 2 may also help, I advise you to take a look.
Update 04.12.2015
Recently, Threshold 2 received a new cumulative update called KB3116908, there are many reviews that this update helped users solve the problem with constant rebooting. MS is advised to install it as soon as possible as it includes bug fixes leading to improved and more stable system.
I also advise you to update your BIOS to the latest version; very often this helps solve the problem with rebooting Windows 10, especially when you have an SSD drive under the hood. I've seen this on Asus and Lenovo
Update 02/17/2016
A new update KB3140742 has been released, it is proposed to download it separately and install it manually, it can solve the problem of cyclic reboots
Update 06/14/2016
Microsoft recently released Windows 10 14361, and according to the developers, the problem with constant rebooting is no longer there, so you need to update to this version.
Update 07/25/2016
Another reason for the cyclic reboot of Windows 10, I identified the installed Avast antivirus program, caught this on a Lenovo b650 laptop, removing this software helped fix the problem
If your computer begins to reboot immediately after turning on or a few minutes after starting work, then there may be several reasons why the computer reboots itself. It happens that the computer at the same time begins to freeze, takes a long time to load, and the like. There may be several main reasons for this problem; usually, you can solve them yourself, without resorting to the help of specialists from the service center. What to do if the computer reboots spontaneously?
The computer restarts when turned on
Once you turn on the device, after a few seconds it reboots itself. And this happens several times, the computer constantly reboots upon startup. First of all, you need to determine the cause. It can be in software or technical issues. First, let's look at the technical aspects, since they are most often the causes of problems.
Why does my computer keep rebooting by itself?:
- Overheat
- Damage to thermal paste
- Contacts are damaged
- The power supply is faulty
Below, we will consider each case and its solution.
Overheat
Three things can overheat in a computer - the main processor, the mother card and the video card. There can also be several reasons for overheating.
Due to improper operation of coolers or large accumulation of dust. To check this, open the system unit by removing the side cover.
Carefully inspect the internal parts of the computer. Typically, coolers are located on the CPU (central processing unit) and on the video card. To check their functionality, turn on your PC. If they turn slowly or make a buzzing noise, they will need to be replaced. But sometimes it is enough to thoroughly wipe all the internal parts from the dust that has accumulated there. To do this, you can carefully vacuum all parts of the computer. For small details, use a brush.
Do everything carefully - processor parts may be damaged by static voltage. Alternatively, wipe everything down with a damp, lint-free cloth. The cooler must be carefully removed, disassembled, removed dust and lubricated with a thin layer of machine oil. It’s also better to remove the video card, unscrew the fans with a screwdriver, and wipe everything thoroughly.
Damaged thermal paste
Thermal paste ensures optimal heat transfer between the internal parts of the computer. If it dries out, heat transfer is disrupted and the computer overheats. Thermal paste is sold in specialized stores. It's easy to replace it yourself. There are many training videos on the Internet with a detailed process of replacing thermal paste.
Overheating may be caused by a lack of external air exchange. If the system unit is located next to a radiator, is exposed to direct sunlight, or is built into a table, try moving it to another location. This may solve the overheating problem. Overheating often occurs during the hot season.
Faulty power supply
An outdated and dusty network unit may cause the computer to constantly reboot. Dry thermal paste or a low-quality motherboard can lead to periodic voltage drops. Because of this, the computer spontaneously reboots after a short period of operation. The problem can be solved by replacing the unit with a more powerful analogue.
Bad contacts
The problem may be with loose contacts. Carefully disconnect and connect one by one all externally visible connectors.
These are the main technical points why the computer reboots itself, but there are also cases when everything is fine from the technical side, the problem is in the software.
Why does the computer restart while playing?
If the computer is working normally, but a reboot occurs while the game is starting, there are several options.
- The game may be too "heavy" for the computer.
- You have contracted a harmful virus.
- Your video card is damaged or you need to update the drivers
The computer may overheat when starting a game that is “heavy” for your system, and automatically reboot. The reason is weak coolers or a low-power power supply. As a rule, a heavy game on a weak computer will not start or will slow down greatly, but it may be that the characteristics of your PC meet the requirements of the game and your video card runs the game without freezing, but the power supply cannot cope with the power consumption of the video card when the video processor is actively working . If this happens to all games, try reinstalling the drivers on the video card or cleaning the system from viruses.
How to reinstall drivers on a video card

The computer reboots itself from Windows 7, 10
The computer constantly restarts when starting Windows 7 or 10. This problem has one solution for both OS.
Windows 10 and 7 may reboot spontaneously after updating. There may be a continuous update feature installed, which can be deactivated and adjusted to personal preference.
First, sign in to Windows Update. Click Win+R, enter gpedit.msc in the line that appears, press “Enter”.
We are walking along the path - “Administrative Templates\Windows Components\Windows Update”.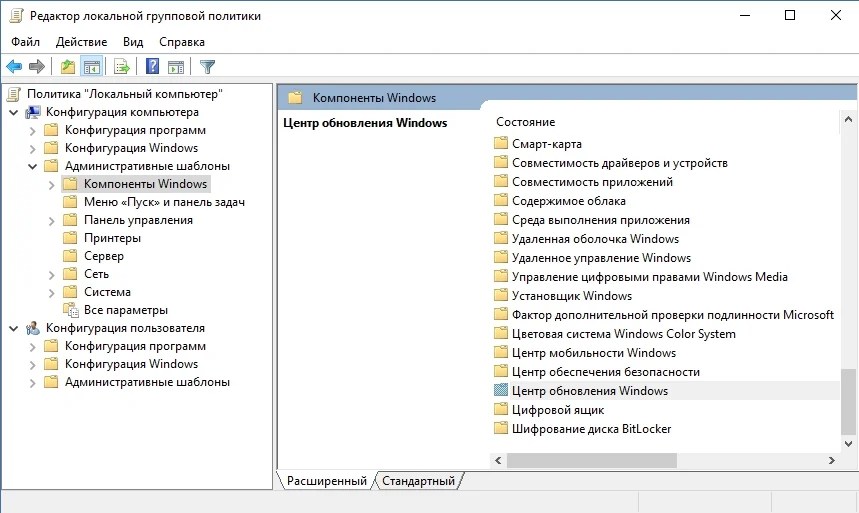
We change two options. First "Do not automatically reboot when installing updates automatically if there are users running on the system". Double-click with the mouse. Put a tick on "Turn on" and press "OK". Next: you need to deactivate the item "Always automatically reboot at the specified time". We also double-click on the parameter and in the pop-up window, check the box "Disable".
After all the manipulations, you need to restart the computer. After this, the problem with Windows 10 or Windows 7 automatically restarting will no longer bother you.
One of the most annoying things about Windows 10 is the automatic reboot to install updates. Although it doesn't happen while you're working on your computer, it may reboot to install updates if, for example, you go to lunch.
This method allows you to completely disable automatic restart of Windows 10 - using the Local Group Policy Editor in Pro and Enterprise versions or in the Registry Editor if you have a home version of the system.
First steps to disable using gpedit.msc

You can close the editor - Windows 10 will not automatically restart if there are users logged in.
In Windows 10 Home, the same can be done in the Registry Editor

The changes made should take effect without restarting the computer, but just in case, you can restart it (since changes in the registry do not always take effect immediately, although they should).
Disabling reboots using Task Scheduler
Another way to prevent Windows 10 from restarting after installing updates is to use the Task Scheduler. To do this, launch the task scheduler (use search in the taskbar or Win+R keys, and enter control scheduled tasks in the Run window).
In Task Scheduler, navigate to the folder Task Scheduler Library - Microsoft - Windows - UpdateOrchestrator. After this, right-click on the task with the name Reboot in the task list and select "Disable" from the context menu.

There will be no automatic reboot to install updates in the future. In this case, updates will be installed when you restart your computer or laptop manually.
Another option, if doing everything described manually is difficult for you, is to disable automatic reboot. The option is located in the Behavior section of the program.
At this point in time, these are all the ways I can suggest to disable automatic rebooting during Windows 10 updates, but I think they will be sufficient if this system behavior causes you inconvenience.
Publications on the topic
-
 We deny the program access to the Internet
There are many reasons to block websites. Some sites may distract the user from work, others contain materials for...
-
 How to charge a new iPhone
When it comes to charging iPhone 10, this little miracle involuntarily pops up before your eyes, which has been included in the kit for several years now...