
How to Bypass Windows Administrator Password to Enable Blocked Features. How to bypass Google account verification after a hard reset Bypass Google account after a factory reset

Setting a password when logging into Windows XP is good, but what to do if you have lost or forgotten your Windows XP password? What should I do? Reinstall Windows?
Forgot your Windows XP password! What to do?
Of course, you can bypass this password if the password is not set to an administrator account. Well, if the password is set to the administrator account, then you will not be able to bypass it, you need to crack it using a special program.
For a novice user, cracking the administrator password of the Windows 7 operating system is a little more difficult than Windows XP. But despite this, in the next article we will definitely analyze the situation with a forgotten Windows 7 password. For now, let’s return to the Windows XP system.
You can bypass the Windows XP password without much difficulty. Let's look at several ways to log into Windows XP.
First way:
Hacking the administrator password using Active Password Changer
If the password is on the Windows XP administrator account, the last two methods of bypassing the password may not help you. You will have to use a little program called Active@ Password Changer.
Active Password Changer can quickly reset passwords installed on Windows XP/Vista/Windows7/8 operating systems. The program is very simple, so you shouldn't have any problems. You simply download this program using another computer and upload it to a flash drive. Place the flash drive on the computer whose password you want to crack, turn on the computer and crack the password. Read more below:
And so we download the Active@ Password Changer program. Size 1.5 MB.
How to use Active password changer?
— Install the Active Password Changer program. We launch it, after which the main program window will open, select our USB drive in the list, and click “Start”:
— The flash drive is ready for hacking, connect it to a computer with a forgotten password.
— Turn on the computer and press the F12 key.
— In the list, select the system boot method, set it and press “Enter”.

— Select the desired account and enter the account number below which has the password and press “Enter”

- And the last action is to press the “Y” key to confirm the hack. You can enter "N" to return to the previous menu. After entering the letter, press "Enter".
— Wait for a message to appear indicating that the password was successfully removed.
- Reboot your computer and you will be able to log in without a password.
Second way:
— After restarting the computer, click on the button F8. After which an additional menu will open with Windows boot options, select from the list "Safe mode";


- After this, a desktop window will open with a message that your Windows is running in safe mode, agree to this by clicking “Yes”.

Your desktop will look something like this;

- Now that you have access to your computer, you can log into your password-protected account and remove the password. To do this, open the Start menu and go to "Control Panel";

Run "User accounts". Next, click on the account icon that is password protected;

— Select from the list of actions "Change Password" and change your password. Or even select a function "Deleting a password" and remove it;

— Restart your computer and log in normally.
Third Method:
— After the password entry window opens, press several times Ctrl + Alt + Delete .

— Another password entry window will open, as shown in the figure below;

Here in the line user, you need to enter the word "Administrator" , and leave the password line unchanged, that is, empty and click “OK”.

- After this, Windows should start, then you need to go to "Control Panel", open "User accounts", Select an account that is password protected.


Enter your new password and confirm it. That's it, you've changed your Windows XP password;

If you do not want to change your password, you can delete it altogether by selecting “Remove password”;
That's all, the password on your computer has been hacked in an easy and simple way. That's all I have
Probably everyone has encountered a situation where an account on a computer is protected by a password that you for some reason forgot or it is simply unknown to you.
But don’t get lost in trying to guess the password, there are specific proven methods for this, which we will consider in this article below:
2 Safe Mode
If the main admin account has a password, then in this case we proceed to the second method. To do this, boot the computer in “safe mode” (to do this, when you turn it on, you need to pressF8) and go to the Administrator account. After this, we perform the actions described in the first paragraph. If this method proves unsuccessful, then we will resort to more radical measures.
3 BIOS and boot disk
We disconnect the computer from the mains power, disassemble the system unit case and find a small battery on the motherboard, which is responsible for the system memorybios"a.
We take it out and put it aside for ten to fifteen minutes, then put it back in. The next time you start the system, press and hold delete, go to bios and use the F10 key to save all the settings.
You should resort to the latter option if the hidden admin account was initially protected with a password.
To hack it you can find on the Interneta large number of special programs that will need to be recorded on an ordinary floppy disk (ordinary disc).
When you turn on the computer, the disk will load and launch this tricky program. The program will remove all passwords from your accounts, after which you can easily log into any account.
Nowadays, there are practically no fundamental means of protecting against hacking computer devices and gaining access to the user’s personal confidential information.
Setting an administrator password is also not very effective in protecting your computer, since there are at least several ways to hack and bypass it.
Hack the Administrator's password and log in using his account - easily and effortlessly
What these methods are will be discussed in this article.
Tip 1. Reset your password using the Command Interpreter in Windows
To do this, we sequentially perform the following steps:
- Click “Start” and select “All Programs”;
- in the tabs that open, click “Standard” and literally in the first lines of the list we see the “Run” option;
- in the “Run” command line, enter “cmd” and “Ok”;
In the “Run” command line we write “cmd”
- A Command Interpreter window opens in front of us, into which we write the command “control userpasswords2”, then press “Enter;
In the Command Interpreter window, enter the command “control userpasswords2” and click “OK”
- “User Accounts” appears on the screen – in the “Users” field, select the account we need;
In the "Users" field, select the account we need
- uncheck the option “Require username and password”, then “Apply” and “Ok”;
Uncheck the "Require username and password" checkbox
- in the “Automatic login” window that opens, enter and confirm the password or leave these fields empty, click “Ok”, “Ok” again;
In the "Automatic login" window that appears, enter the password or leave the field empty.
- close the command line window and restart our computer.
Tip 2. Reset the password for the Administrator account in Safe Mode
To reset the built-in “Administrator” account, we proceed step by step according to the instructions below.
Step 1. Restart the computer and press the F8 key while loading.
To enter Safe Mode when you turn on or restart the computer, press the F8 key
Step 2. In the menu that appears, we are asked to select one of the additional options for loading the Windows operating system - select “Safe Mode”.
In the menu of additional boot options, select Safe Mode
Step 3. Next, log in to the system using the built-in Administrator account, which usually does not have a password by default. To do this, enter “Administrator” or the same word in Russian in the login field. Leave the password field blank and just press “Enter.”
In safe mode, select the non-password-protected built-in Administrator account
Step 4. In the window that appears warning that Windows is in Safe Mode, click “Yes” to confirm.
Click "Yes" to continue working in Safe Mode
Step 5. We start working in security mode - as soon as the desktop loads, click the following sequence of options:
Start –> Control Panel –> User Accounts
In Safe Mode, select "User Accounts"
Step 6. Place the cursor over the user name whose password you need to edit or reset, and click on this account icon.
Step 7. In the menu that appears on the left, select the “Change Password” item, enter a new password and confirm it. If we are simply resetting the password, then we leave this field empty.
In the menu on the left, select the “Change Password” option, then enter a new password and then confirm it
Step 8. Click the “Change Password” button.
Enter the password and confirm it
Step 9. First close the “User Accounts” window, then the “Control Panel” window.
Step 10. Reboot the computer.
Tip 3. How to reset the password for the built-in Administrator account
This advice will be useful to those who are faced with a problem when the built-in account is protected by a password, which we, of course, conveniently forgot. So, we act according to the instructions below:
We need a CD (or flash drive) with a set of resuscitation programs to restore Windows, which we insert into the drive, and then reboot our computer.
A recovery disk is ideal for system recovery.
When starting the computer, enter the BIOS by pressing the “Dilete” key.
Entering the BIOS using the Dilete key while restarting the computer
In the BIOS, we change the installation priority and assign the computer to boot from the CD-ROM. Next, we place our boot disk with the operating system in the drive and reboot the PC.
In the BIOS we set boot priority from CD-ROM
After the computer boots from the CD-ROM, the recovery disk menu appears on the screen, in which we select the edited copy of Windows and go to “System Restore”.
In the edited copy of Windows, select "System Restore"
In the System Recovery Options dialog box, select Command Prompt
In the command field that opens, enter “regedit” and confirm the command with the Enter key.
Find and select the HKEY_LOCAL_MACHINE section, and select File from the menu, and then Load hive.
Find and select the HKEY_LOCAL_MACHINE section
We need to open the SAM file, then select the section HKEY_LOCAL_MACHINE\hive_name\SAM\Domains\Account\Users\000001F4, then double-click on the F key and go to the very first value in line 038 - the number 11, as shown in the photo.
Select HKEY_LOCAL_MACHINE.. and double-click on the F key
We replace this number with the number 10, while being very careful, since only this number needs to be changed; other values are strictly prohibited from being touched.
We replace this number “11” with the number “10”
In the same section HKEY_LOCAL_MACHINE\hive_name\SAM\Domains\Account\Users\000001F4, select the File menu, then Load hive and then “Yes” - confirm the unloading of the hive.
Select the menu File - Load hive and confirm unloading the hive
Now we close the registry editor, as well as the entire installation process, take out our disk and reboot the computer.
Hack the Administrator password in Windows 8
The Windows 8 operating system has its own simple way to reset the Administrator password. All you need to do to do this is follow the steps below:
Step 1. Go to the “System Restore” section, and then the “Diagnostics” console, where we select the “Advanced options” section.
Modern phones are not just personalized and belong to you “body and soul”. Everything is much more serious: if one day you forget the password for your Google account and this account itself, or your friend or relative gives you the phone, and you want to remake it for yourself, you will encounter an unpleasant problem: the phone will require the “old” account, and you will need Bypass FRP account on Android.
There is a huge amount of advice on the Internet, but you should immediately warn that most of them are outdated. They are talking about old versions of Android, up to 2015, and if you need to bypass Google account on a phone that is only a few months old, then these methods will not work. But the one discussed below will do.
This is the newest way to bypass Google FRP account on Android. It will be useful for owners of new phones with the latest firmware.
So, our phone.
Before you start “dancing with a tambourine” in order to unlock your Google account on your Android device, download the small BypassFRP file from this site. This is an apk file, that is, an application for Android. The link will be indicated at the end of the article, you can immediately look there and then return back.
Connect your smartphone via USB to your computer and download the downloaded apk. It is best to use the Downloads folder for this purpose. That is, “Downloads”. Now let our file wait in the wings, and we will break through Google's stubborn FRP protection.
Follow the instructions.
Select your language and click “next”. It will first ask you to connect to Wi-Fi. Allow him to do this; bypassing your Google account on Android will not interfere with your connection to the Internet. Then turn on your computer and download the SideSync program. This is an official Samsung program, so you won't have any problems finding, downloading and installing it. It also weighs a little.
And this is why we need it. As soon as you install it, connect your stubborn device on which you need to unlock your Google account. You will see a window open where the SideSync program will offer to install itself on the gadget. But you don't need that. Instead, click search in the upper right corner, there is also a magnifying glass drawn there. SamsungApp will prompt you to log into your account, log in or create a new one and then log in.
After that, download the file manager for apk files. It's best to use ES File Manager. Just start typing the name and the device itself will tell you which application you are looking for.
Download and install, then launch. Through the file manager, we go to the Downloads folder, where the same apk is waiting for us in order to bypass Google FRP. Select and launch it. The phone will act a little more and ask if you trust unknown publishers; this can be easily fixed in the settings.
And now - the treasured application is installed. Let's launch it. It will require some kind of password unknown to science, but don’t be afraid, but click on the bar at the top, which means “log in through the browser.”
And now, finally, after all the torment, you have a window in front of you in which you can bypass Google account on your phone. Use yours or create a new one, it doesn't matter.
Turn off the phone, turn it on again - and it is completely yours with a new account, and no longer requires the one to which it was previously linked.
You can find many other methods on the Internet, but not all of them work, and not all of them are simple.
This method is the simplest and most effective. And now the link to the apk file: Incorrect ID.
By registering a Google account on your Android phone or tablet, you agree to one implicit condition: you will be let in, but not let out. No, someone won’t take your account captive and pin it to your device forever; simply registering a Gmail email and making it your account is a much clearer and more obvious operation than deleting it. However, there are plenty of ways to remove a Google account from an Android device. They just don't catch your eye.
This method is built into the Android function. It will suit you in the following cases:
- You have decided to give your gadget to a loved one and you are not embarrassed that he will have access to your data, contacts and applications, because you trust him.
- You need to delete your account to fix some glitch on your device.
- You want to log in with a different account.
You don’t have to worry about the data on your tablet or smartphone. After deleting the account, all information belonging to it - applications, files, contacts, personal settings, etc., will remain in place. If you're happy with that, let's go:
- Launch the Settings app.
- Go to the “Personal” -> “Accounts and Sync” section.
- In the column on the right, select the desired Google account (Gmail address).
- Tap the menu button in the top right corner of the screen and select the “Delete account” option.

- Confirm your consent to deletion, enter a password if necessary, and after completing the operation, reboot the device.
Something went wrong and the account is not deleted
I had to deal with this error several times - when I tried to delete the only Google account on Android (the owner of the gadget), the operation froze and did not complete until you stopped it manually. The account remained in place.
One of the solutions turned out to be extremely simple. It is for the case when you want to log in to the device under a different account, make it the owner, and delete the old one.
- Launch the Gmail app by tapping this icon.

- Open the menu hidden behind the “hamburger” button in the top left corner of the screen and click “Add Account.”

- Select Google.

- If you already have another Gmail account, click Existing. If not, “New”. If you choose the second option, follow the instructions for registering a mailbox that you will receive next.

- Next, go to the settings of the Gmail application again. Now there are 2 users there - old and new. One (usually the old one) is loaded as the main one, the second is simply present in the list. Switch to the user you just added by tapping their icon.

- After that, click “Manage accounts” and repeat the operation of deleting the old one. Most likely, this time there will be no problems. The second account will remain the only one and will become the owner of the device. All files, contacts, settings and applications of the old account will be in place.
On different gadgets and different versions of Android, individual points of this instruction may not be performed as described. But the principle is the same everywhere.
Deleting Google Accounts app data
On some devices, you can delete your account in another simple way. Launch the “Settings” system utility, go to the “Applications” section and go to the “All” tab. Find “Google Accounts” in the list and click the “Erase data” button.

On some firmware, you should erase the data not of this application, but of Google Services.
Removing your Google account and all user data (returning the device to its original state)
This option is applicable in the following cases:
- If the owner does not remember his account password and cannot recover it.
- If the above methods for deleting an account do not work correctly or the function is blocked by malware.
- Before selling a gadget and in other similar cases.
There are different ways to delete all accounts and all user information from your phone. The easiest way to do this is through the menu of the same “Settings” application. In my example, the reset button is located in the “Personal Data” - “Backup” section.

On other firmware, both the subsection and the button may be named differently and located in a different location. In particular, on Samsung it is located in the “General” menu and is called “Backup and Reset”, on some Lenovos it is in the “Backup and Reset” section (the “Reset” button). On other devices - anywhere else. Check this in your user manual.
After you press the reset button, Android will warn you that all apps, settings, and accounts will be completely removed from your tablet or phone. If you agree, click "Reset Settings" again and wait about 5 minutes. After restarting you will get a pristine device.

If your device is protected with a password that you don’t remember, you can reset it in a couple of other ways:
- Via the Recovery menu (Wipe Data/Factory Reset option). How to get to this menu, read the instructions for the device.
- Long press the recessed Reset button located on the body of the phone or tablet. On some models it is hidden under the back cover.
An even tougher method of deleting an account, when absolutely nothing helps, is to flash the device through a computer, which is similar to reinstalling Windows on a PC. Of course, there will be no user data and applications left after this either.
Warning: some tablets and phones are so tightly tied to the owner’s account that they require authorization under it even after resetting and flashing. And bypassing this request is very, very difficult (there is no single solution, each brand of device has its own). So while you have access to your Google account information, write down your username and password in a notebook or file on another device and keep it in a safe place.
For those who have root rights
Those who managed to obtain superuser rights on their device have one more opportunity to delete their Google account than others. You can simply delete the accounts.db file where Android stores account information. To do this, you will need a file manager with access to protected service data, such as Root Explorer, and... nothing else.
So, launch Root Explorer, go to the /data/system folder (on some firmwares - to /data/system/users/0/), open the accounts.db context menu with a long touch and select “Delete”.

How to log out of your Google Play account, mail and other applications without deleting your account on Android
Some users are wondering if it is possible to remove your account only from the Goolle Play store, Gmail and other applications that use authorization, but keep all files, programs and settings on Android. I answer: it is possible. If the method of adding a second account through the email program did not help, you can do this by changing the password of your current Google account.
For this:
- Go through any web browser to the “My Account" section on Google.com. Go to the “Security and Login” subsection.

- On the next page, click the "Password" button.
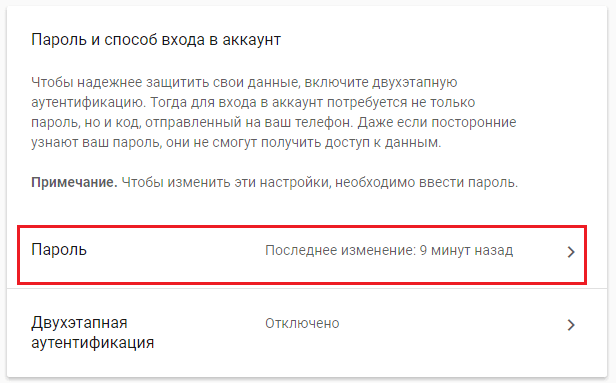
- Enter your current password to confirm that it is you. Next, you will have the opportunity to change it to a new one.

If your gadget is connected to the Internet, the next time you log into Google Play and your email program, the system will ask you to log in. All you have to do is enter your new account information
Publications on the topic
-
 How to get trading cards on Steam quickly?
Collecting cards is one of the favorite pastimes of many Steam users. Cards are collectible items...
-
 The best horror games on PC
Every year it becomes more and more difficult to scare players. Gone are the days when the audience in the cinema shuddered at the slightest...