
How to connect a sound card. Complete setup and installation of Realtek High Definition Audio Go to sound card settings

Not everyone is satisfied. There are especially many dissatisfied with the built-in sound among cheap users. Therefore, many users decide to install a discrete sound card. In this article we will tell you in as much detail as possible about how to install a sound card in a computer.
First, a little theory. Discrete sound cards can be external or internal. External sound cards are designed as a separate device and are connected to the computer using an interface. Internal sound cards are made in the form of a separate board and are installed inside the case. In this article we will talk about installing the internal sound card.
To connect the sound card to the motherboard, use a PCI or . You can easily distinguish a PCI sound card from a PCI Express x1 sound card. PCI boards have a long header with many pins, while PCI Express x1 has a much shorter header.
The connectors on the motherboard are also different. PCI slots are longer and are located at the very bottom of the motherboard. PCI Express x1 slots are more connectors that are located between full PCI Express x16 slots or between PCI Express x16 and PCI.

Before buying a sound card, make sure that your motherboard has a PCI slot. Modern motherboards are not always equipped with this connector. If your board does not have PCI, then you need to choose a sound card with PCI Express x1.
So, now that we have studied the theoretical part, we can begin installing the sound card. The first thing you need to do is disconnect all cables from the system unit and open the side cover of the computer. In order to install the sound card, we only need to open the left side cover.
After you have opened the side cover of the computer, inspect the motherboard. You need to select the connector (PCI or PCI Express x1, depending on which sound card you purchased) that you will use to install the sound card. It is advisable to choose a connector that is located away from already occupied connectors. For example, if you have a video card installed, then try to choose a connector for the sound card in such a way that the sound card does not block the air supply to the video card fan.

On high-quality computer cases, these plugs are secured with screws. On cheap cases you just need to break off the plug.
After this, you need to carefully install the sound card into the connector. When installing, you don't need to put a lot of effort, just apply a little pressure on the card.

When installing, you need to make sure that the back panel of the sound card fits into the gap between the motherboard and the computer case. After the sound card is installed, you need to secure it with a screw.

This completes the process of installing a sound card into a computer. You can close the side cover, connect cables, and turn on the computer.
External Sound Card
A sound card converts sound from analog to digital and vice versa, and is used for sound recording of computer operation, games, recording and playback of sound. Sound information is input via a microphone, which can be connected to the sound card input. The sound card can also synthesize sound (the sounds of various musical instruments can be stored in its memory).

external sound card for laptop
There are several types of sound cards: integrated, internal ( internal) and external ( external). Integrated cards are simply special chips installed on motherboards. They cope well with the sound of various events in the operating system or installed applications: sound in games, video files and simple music playback.
It is not possible to provide high-quality audio products with their help. High-quality sound can only be achieved by installing an additional external or internal sound card. Sound cards can be divided into “simple” (used in everyday life) and “serious” (all others). “Simple” ones practically do not differ in functionality and parameters from integrated ones. And “serious” ones can already be used for serious work with audio material. They have fairly high-class DAC-ADC converters installed.
Such sound cards provide the ability to work with high bitrates ( bit rate file bit depth) and sample rate ( samplerate – sampling frequency). They have support for the ASIO protocol and good signal-to-noise ratio, which is measured in decibels - dB, dB.With the help of a professional sound card, you can carry out complex sound processing; they provide stereo sound and are equipped with their own ROM, which stores hundreds of tones of sounds of different musical instruments. First, let's look at some terms that will appear here.
- ADC(analog-to-digital converter) is used to convert continuous (analog) audio signals (noise, speech, music) into digital binary code.
- DAC(digital-to-analog converter) converts stored digital audio back into analog audio, which can then be played back using headphones, speakers, and an audio synthesizer.
Digital audio is a way of representing an electrical signal through discrete numerical values of its amplitude. Signal digitization consists of two processes: sampling (sampling) and quantization. The sampling process is the process of obtaining the values of quantities for the converted signal over certain periods of time. Samplerate ( samplerate) is the sampling frequency ( sampling rate) and is measured in hertz ( Hz).

sampling step
Quantization is a process in which the real values of a signal are replaced by approximate ones with a certain accuracy. The quantization level is called bitrate ( bitrate), and the amount of information per unit of time ( bits per second) and is measured in bits ( bit).

quantization levels
The sampling frequency sets the upper limit of the frequencies of the digitized signal, that is, the maximum frequency of the spectral components is equal to half the signal sampling frequency. Therefore, to obtain complete information about the sound in the frequency band, for example, up to 22,050 Hz, you will need sampling at a frequency of 44.1 KHz.
Sound files are large in size. For example, a three-minute stereo audio file can take up about 30 MB of memory. Because of this, in addition to the basic functions, Sound Blaster boards have an automatic file compression function.
In today's situation, external sound cards are gradually replacing internal ones. This is also due to the fact that you don’t want to be limited by the capabilities of the system unit and the presence of some sound interference for the sound card installed inside. This article will describe the process of installing and configuring an external sound card for a computer and laptop.

An external sound card can be connected to a computer or laptop via USB, FireWire or ExpressCard. Before purchasing an external sound card, just as before purchasing an internal one, you need to have a good idea of what you plan to use the computer for. According to your requirements, you need to choose a sound card.
The sound card for a laptop is selected taking into account mobility, usually in the form of a small flash drive and connected via a USB port. A 5.1 multichannel stream is needed to play movies recorded in a 5.1 system or games with similar parameters. Therefore, sound cards that are designed to reproduce stereo sound will not provide normal playback of games and movies in 5.1.
For simpler purposes, such as working with text, such sound quality is not required, and there is no such need to purchase a separate sound card. If your external sound card is connected to your computer via a USB port, check to see if you have a free USB port. If you decide to purchase a professional sound card, then it must meet the following requirements:
- AD-DA converters A-class;
- Sampling frequency within 44,100 – 192,000 Hz;
- Dynamic range 90 – 120 dB and more;
- Bit depth – 24 bit;
- ASIO 2.0 support;
- Headphone output;
- Microphone-instrument combo inputs (XLR-TRS);
- MIDI interface;
- Digital interface S/PDIF In/Out;
- Availability of several inputs/outputs (I/O) with Full Duplex support (the ability to simultaneously record and playback a signal);
- A-class converter provides maximum quality and minimal signal distortion;
- Increased sampling frequency expands the dynamic range of the signal recording and improves the final quality of the mix;
- Extended dynamic range allows you to work with weak signal sources without the need for additional processing;
- A MIDI interface is needed to connect a MIDI keyboard or MIDI controller to control special audio software (ProTools, Cubase, Audition etc.);
At least two inputs must contain microphone (XLR) and instrument (TRS) preamps and be able to connect a guitar with the ability to supply phantom power (+48 V) used for studio microphones. The presence of several Full Duplex inputs and outputs for simultaneous recording and playback of several channels.
Many modern sound cards can replace a mixing console. Some of the sound cards are highly specialized. For example, the Delta series from M-Audio is available only with TRS connectors into which only linear devices (tape recorder, synthesizer) are connected. It is impossible to connect a microphone directly to such a card; you will need a separate preamplifier. To install an external sound card, there is no need to open the case of your system unit; you have access to all the necessary sockets. Sound cards that connect via USB are portable. Connecting and disconnecting them does not require restarting the computer. The sound card for a laptop can be easily carried along with it, and when necessary, it quickly connects and starts working. Such cards are designed to quickly solve the problem of audio output and, based on this, cannot have more than 2-4 inputs.
When working on mobile, there is rarely a need to simultaneously record several tracks at once. For simultaneous recording of more than 6-8 tracks, it is better to use FireWire. The FireWire standard (IEEE1394) was developed for video streaming and audio systems with this interface are more stable than those with USB. FireWire provides more options for the musician's work. Many FireWire systems have the ability to work autonomously, like an external mixer (without connecting to a computer). Among such systems are FOCUSRITE SAFFIRE PRO 40 I/O Firewire, Echo AudioFire 2, M-Audio ProFire 610.

FOCUSRITE SAFFIRE PRO
A laptop sound card can be installed in the ExpressCard port.

Such devices make it possible to obtain sound quality better than from built-in codecs. They are protected from interference by a screen in the form of a metal case. One of the first such devices was the Creative X-Fi Xtreme Audio Notebook, released in 2007. This model had only three connectors: a 3.5 mm headphone output combined with linear and optical digital outputs, a microphone input and an optical digital input, and a port for the Speaker Docking Module (connecting multi-channel acoustics). Among the inexpensive models that support the USB 2.0 interface, we can note the Creative Sound Blaster X-Fi Surround 5.1

Creative Sound Blaster X-Fi Surround 5.1
This laptop sound card uses a good X-Fi sound processor that provides support for X-Fi CMSS-3D and X-Fi Crystalizer audio processing technologies. The card supports multi-channel 5.1 audio at a sampling rate of 48 kHz and 16 bits. A typical external sound card may contain the following connectors:
- MIDI port or game port. This 15-pin female connector is needed to connect a MIDI keyboard, joystick or synthesizer.
- Microphone input
- Line input
- Line output (connection of active speakers, amplifier). If the board is designed to connect several speakers, then there may be more of them.
- Audio output A signal passed through a low-power (2-4 watts per channel) amplifier is fed to it. The quality of this amplifier is only suitable for connecting headphones.
- Digital output for connecting to external digital devices. Installed only on expensive cards.
- Digital input. Rarely seen.
The MIDI connector of the sound card is used to connect keyboards, synthesizers, joysticks, etc.

MIDI connector
Universal USB Port:

The connectors on the sound card are marked with special icons, which show where the input is and where the output is:

Setting up a sound card
The initial sound setup on a computer is performed immediately after the operating system is installed. To ensure normal operation of the sound card, you need to install the drivers that came with the motherboard or download it from the Internet. To check the installed drivers, open Device Manager. If there are no yellow triangles with question marks in the device manager, this means that the drivers were installed correctly.

device Manager
If there are question marks, it means there are problems with the installed drivers. HD-Audio sound cards sometimes require an XP update.

If you do not see the entry “this device is turned on and working normally” in the audio and video codecs, this means that the driver was not installed correctly and such drivers must be reinstalled.
You can watch a video with an example of reinstalling audio drivers below:
Before reinstalling the driver, you need to remove all sound-related programs and restart your computer. Let's look at setting up a sound card using standard Windows Vista/7/8 tools. To configure, you need to select Windows Control Panel->Hardware and Sound->Sound. In the window that opens, on the first tab, double-click on the playback device that you need to configure.

Equipment and sound
The main volume is set to maximum, and all unused sources (line-in, microphone) are turned off. The channel controls (Rear, Front, etc.) are set to the maximum position.

sound effects
The choice of sound effects depends on the installed sound card. Enabling/disabling these options affects the software effects that are applied when outputting in general mode. If the output is via WASAPI Exclusive, then this option has no effect.

WASAPI Exclusive
In the additional properties, it is important for us to enable the exclusive mode, which is necessary for WASAPI to work. Adjusting the frequency and bit depth only works in general mode. This is the reference frequency and bit depth for the software mixer to which all sounds entering it are reduced. According to the characteristics of your sound card, you need to set this frequency. If the sound on your computer suddenly disappeared, although you did not turn it off or install new programs, then you can do the following:
- You need to check the integrity of the wire connecting the speakers or headphones;
- Check if power is supplied to the speakers;
- Check how the sound is configured on the computer. You may have accidentally checked the “ticket” in the settings where “mute sound” is checked. To do this, open the Toolbar/Sounds and Audio Devices, and select the “Volume” tab. There you need to open the “Advanced” tab and see if the “bird” is selected to “Off” for “Sound”.
Connecting a sound card to a receiver or amplifier
There are three options for connecting a sound card to an amplifier (receiver):
- Via digital SPDIF (tulip type or optical).
- Via Digital HDMI.
- Analog output: stereo mini-jack connector (3.5 mm) – 2 tulips, stereo jack connector (6.25 mm) – 2 tulips (professional audio cards). The SPDIF output of the computer is connected to the SPDIF input of the receiver using a regular cheap tulip-to-tulip cable. A digital cable does not affect the quality and transparency of the sound. If the cable is more than 2 m long, then it is advisable to buy only high-quality ones, especially if it is walled into the wall.
When connecting via an HDMI connector, you need to take this point into account. HDMI interfaces come in different versions: 1.0, 1.1, 1.2, 1.3, 1.3a.

hdmi cable

amplifier connector
The connector looks exactly the same, only the throughput differs. Therefore, for versions 1.3 and 1.3a it is better to use a more expensive and high-quality cable (certified for HDMI 1.3). This cable has increased noise immunity to ensure high data transfer rates.
Hello George, you're from the jungle!
I continue to prepare you for recording songs at home.
In the previous article I told you at home on the computer. You should read about the external sound card and music software.
From this article you will learn, how to plug an electric guitar into a computer to play.
Uncover your electric guitar, external sound card and turn on your computer with REAPER installed, let's begin.
Connecting an external sound card to the computer
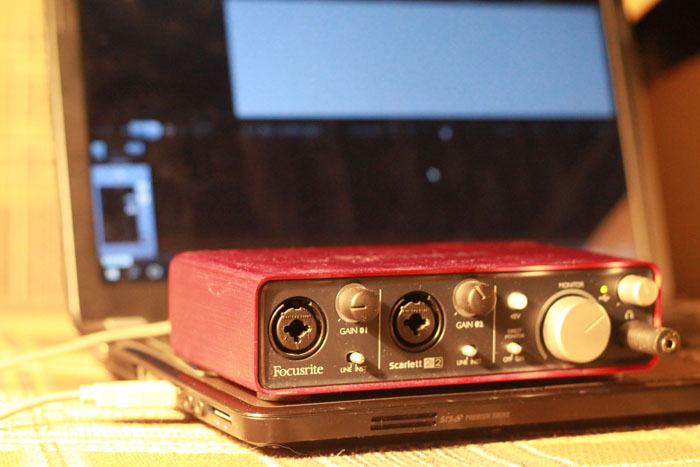
I advised you to get a Focusrite Scarlett 2i2 or Scarlett 2i4 sound card. They connect to your computer via USB, like many others. Plug the USB cable into the connector on the back of the sound card and leave it for now.
Driver
Like any computer hardware, an external sound card needs a driver to function properly. This driver is called ASIO.
If you have a Mac with OS X on board, forget about ASIO. On a Mac, everything works as it should without it - plug in and play.
Latest driver version download from the sound card manufacturer's website. I didn't find the driver on the site - no problem. Check the disc from the box with the sound card - the driver should be there.
The driver installer can be called anything, it may not even have the word ASIO in its name. No problem - all external audio speakers run on ASIO.


Matthew, how do I connect everything already?
First install the driver on your computer, then connect the sound card directly to the USB connector on the rear panel of the system unit.
It is important to plug directly into the rear panel of the system unit without USB hubs and extension cables. This is the only way the sound card will get enough electrocution. USB hubs and front USB connectors often do not have enough current - the sound card may not start or fall off during the recording of your masterpiece riff.
If you connect to a laptop, you can plug it into any USB connector.
The sound player is ready to deliver rock.
Configuring REAPER to work with an external sound card
Launch REAPER and wait 5 seconds, because you love freebies, just like me.

It is important not to switch to another window to while away the 5 seconds of painful waiting. Switch to the browser to look at the kittens - the evil timer will stop until you go back to the REAPER window.
Poke it on the screen, read the composition of the air freshener and after 5 seconds press the button Still Evaluating. REAPER is at your disposal.
Now REAPER works with the sound card built into the computer. Switch it to your cool fashionable external audio speaker:
- Go to the menu Options → Preferences and in the list on the left select:

- In the drop down menu Audio system choose ASIO and in the menu that appears ASIO Driver select your sound card driver. I have it signed as Focusrite USB 2.0 Audio Driver:
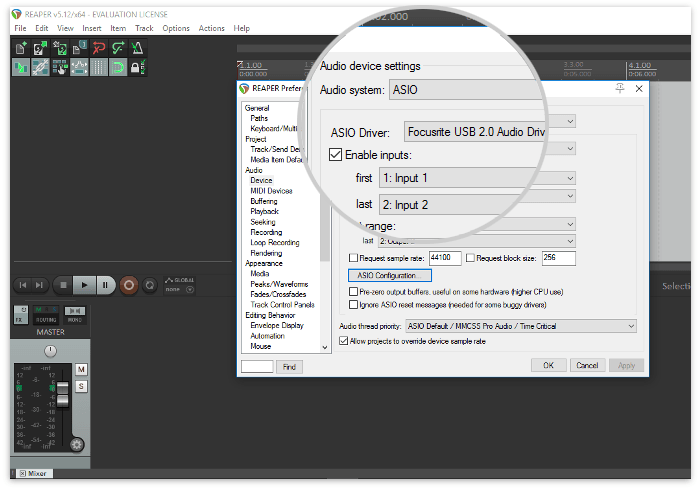
- Make sure that Enable inputs is checked and the inputs and outputs of your sound card are selected:

- Now we need to reduce the sound delay to make playing the guitar enjoyable. Press the button ASIO Configuration and put the slider on 3ms, then save all settings using the buttons OK:

The less ms you choose, the lower the delay, the more the computer processor sweats. If you hear clicks when playing the guitar, your processor has crap, sorry.
The solution is to increase the delay. Don't panic, even with a delay 10 ms You can play and not break off. But the shorter it is, the sweeter it is, George.
Checking systems
Scarlett 2i2 has two inputs. Plug your guitar into any - universal inputs for guitar and microphone. Turn down the knob GAIN to minimum and set the switch LINE INST under the entrance to the position INST. This is an instrument input mode - suitable for live instruments, and LINE- for microphones.
Plug your headphones into the headphone jack. Please note that the socket for a thick (professional!) jack is 1/4 inch. Normal studio and DJ headphones come with an adapter from the 1/8 jack familiar to your hipster cassette player to a 1/4 jack.

Other external sound cards are plugged into the same way as Scarlett. Other sound cards may have separate inputs for guitar and microphone, so there may not be a LINE INST switch. The GAIN knob or its equivalent may not need to be set to minimum, but turned up.
I warned you.
Now try playing through REAPER:

All effects, guitar processors and samplers are added to the tracks in the same way as in the Distortion example. You can add as many effects as you want to a track and even create chains of effects.

Possible problems
When I was fiddling with the settings, I suffered a lot: the sound was distorted, or the sound card was turned off.
So that you don’t regret contacting me, here are a couple of possible problems and their solutions:
- The sound in REAPER is unpleasantly distorted and clicking. Your Pentium 3 can't cope, increase the delay in the REAPER settings to 5 ms or more.
- The sound card shows no signs of life or falls off after a while. Make sure you have a sound card plugged in directly to USB 2.0 on the rear panel of the system unit. It didn't help - try other USB connectors.
- My ass is numb. A hopeless situation.
Congratulations, you've almost joined the ranks of digital audio recording enthusiasts. High five.
In the next article you will learn a quick way to sign up. Very fast and light - without REAPER, without VST plugins and multi-track recording. To do this, you will need a JamVox virtual guitar processor - this article will be about it.
Take a look and subscribe, for example, to my Instagram.
We have a channel on Telegram. Subscribe and a couple of times a week you will receive microposts about sound recording and mixing, musical equipment and music theory.
Si Yu Song, George of the Jungle.
The article again turned out to be the size of a sperm whale. Apparently this is fate.
Now I will write all the tags: #how to connect a guitar to a computer #recording a guitar through a computer #how to record a guitar #how to record an electric guitar #how to connect an electric guitar #how to make music #sound recording for dummies #recording music #home studio #creating music #reaper #kontakt #bias #focusrite #scarlett2i2 #scarlett2i4 #audiointerface #ja mvox #homerecording #how to recordrock #music # rock #hipstar #sofaguitarist #fur #sound recording article #where to start recording music #this is a nonsense #how to record a song #how to record a track #interstellar #Matthew McConaughey
PC owners often need to upgrade or repair the sound subsystem, and they wonder how to connect a sound card. The reasons may be different: failure of the old one, the goal is to get better sound by replacing the integrated card of the motherboard with a modern sound device.
Let's look at the existing equipment before buying a sound card. If you own a PC, there are several connection options. For laptop owners, due to the platform features, it is possible to connect a sound card only via a USB connector. Before purchasing a card, you need to examine the PC motherboard. On older models, you can use the PCI connector for connection. Manufacturers of modern motherboards and sound cards suggest using a PCI Express x1 connector for connection. Newer models may not have a PCI slot. Therefore, you need to carefully read the description of the technical characteristics of your motherboard, finding out which of the presented connectors are in your model. Disable the built-in one or remove the old discrete card. To avoid conflicts and possible malfunctions, you need to go into the BIOS of your PC or laptop, alternately pressing the DEL and F2 keys during boot. Next, you need to go to the tab or item called “Advanced”. Here, in the “Integrated Peripherals” operation parameter for integrated devices, disable the built-in card: set Onboard Audio or High Definition Audio Driver from Enabled to Disabled.


This way, you can then fully enjoy all the benefits that your new sound card model offers. Replacement is a fairly simple matter if you approach the process responsibly and prepare, backed up by theoretical knowledge.
A complete description of the parameters, as well as instructions for setting up built-in Realtek sound cards. Setting up playback, recording, 3D sound. Windows Vista/7/8
2012-02-17T18:19
2012-02-17T18:19
Audiophile's Software
Copyright 2017, Taras Kovrijenko
Full or partial copying of the text is allowed only with the written permission of the author.
Prologue
This time I will touch on a topic that is relevant, so to speak, for beginner enthusiasts - that is, for those who have not yet acquired a discrete sound card and want to get the most out of an integrated one.
1. Educational program
To begin with, a short educational program. Who doesn’t know or doesn’t fully understand what it is hardware audio codec, carefully read the relevant Wikipedia pages:
Have you read it? Great! And now it would be very nice if you read my two articles:
Well, now we can start.
2. What do we have
So, I have at my disposal the Windows 7 SP1 Ultimate x64 OS (the setting described in the article is suitable for all operating systems starting with Vista), the ALC887 codec built into the motherboard (ASUS P7H55-V) (there is a datasheet), an external amplifier connected to the rear connectors and microphone (green and pink sockets, respectively). Please note that we will configure the card for withdrawal stereo sound by analog interface.
3. Software installation
First of all, you need to install the drivers. Of course, most likely the Windows OS itself has already found and installed the drivers for the sound device, however, to gain access to all the functionality, as well as for peace of mind, we will install the driver package directly from Realtek, the latest version of which you can download on the corresponding page of my website. By the way, the settings specified here were tested on driver version R2.67.
Download the drivers and perform a simple installation procedure (by running HD_Audio/Setup.exe), reboot the computer.
After loading the OS, a brown speaker icon should appear in the system tray:
4. Driver setup
First of all, let's go to Windows Control Panel->Hardware and Sound->Sound and, making sure that our headphones or speakers are connected to the green socket of the sound card, we disconnect all unnecessary devices, and make our connected device the default device:

At the same time, let's do the same with recording devices:

Now double-click on the tray icon. If there is no icon, look for it in hidden icons; if it’s not there either, go to Control Panel->Hardware and Sound->. One way or another, the dispatcher window should open:

Here we immediately set the speaker configuration (stereo), set our analog device as the default device (after which the corresponding button will go out), turn off surround sound if, God forbid, it’s turned on.

Using the button in the form of a yellow folder, you can configure to disable detection of front panel connectors:

Also note that the connected connectors are displayed in bright color - in our case, speakers are connected to the green output, and a microphone is connected to the pink input. There is one very important detail here: by double-clicking on the connector icon, you will see a window with a choice of the type of connected device. This is important because if you choose "headphones", then the codec will use a special additional amplifier (otherwise the sound in the headphones will be too quiet), but for connected active speakers or external amplifiers you should select "Front Speaker Output". Here you can enable the automatic pop-up of this window when you connect a device to any of the card connectors:

Using the “i” button, you can open a window with information about the driver version, DirectX, audio controller and codec version, and you can also turn on/off the display of the icon in the system tray:

Now let's turn off the effects:

The “Room Correction” settings for the stereo configuration are not available, which is strange - in the same console from THX (which is included, for example, in the Creative X-Fi driver package) you can adjust the distance and angle of direction of the speakers relative to your location, which It can be very useful when you are not sitting directly in front of the speakers, or they are located asymmetrically relative to you. Well, okay, let it be on the conscience of the developers.
The last tab duplicates the control panel settings (however, most of the settings from the Manager are also in the control panel):

Here you can set the parameters of the system mixer - at what sampling frequency and bit depth Windows will mix all played sounds. Let's set it to 24 bit, 96 kHz. I’ll tell you why later.
Since I am constantly bombarded with questions about how to set up a microphone (which, in my opinion, should cause a minimum of confusion), I will still focus on setting up recording devices. Their settings, by the way, as well as playback devices, are located on separate tabs at the top of the window. Let's start with the stereo mixer:

Everything here is elementary. This device records everything you hear through the speakers, that is, the finished audio stream that Windows transmits to the sound card. It is reduced to the specified form (since the mixer operates with a sampling frequency of 96 kHz, then we will set the same here).
But our main recording device is, of course, the microphone:

So, set the recording volume to maximum and turn off the microphone gain (then, if necessary, you can turn it on). Also, very often people complain that they reproduce the sound picked up by the microphone; to prevent this from happening, we turn off the playback. To your taste - noise filtering, echo suppression. On the tab , again, the recording format is set:

Considering the characteristics of the sound recording path, the standard 16 bit/44.1 kHz will suffice here.
5. Setting up foobar2000
In principle, the work done is enough to ensure the highest (for this card) sound quality in any player. But for the truly paranoid, I will provide foobar2000 settings. We will need, in fact, the player itself and several plugins for it - WASAPI output support And SoX Resampler. Well, or you can download my assembly, which already has everything.
So, in the player output settings (File->Preferences->Playback->Output) select WASAPI:<наше устройство>
, set the bit depth 24 bit:

When outputting through WASAPI Exclusive, all sound card effects (if enabled) are bypassed, as well as the Windows mixer (for which we specified the sample rate).
Now let's move on to the DSP settings:
 Here we add the resampler SOund eXchange and Advanced Limiter to the chain. In the resampler settings, set the frequency to 96 kHz.
 Now why 96 kHz? I conducted a series of experiments and this is what I found out. In Front Output mode, if the volume control is set to more than 90%, when playing the test tone udial(sampling frequency - 44.1 kHz) strong distortion is heard. The distortion disappears if you either lower the volume, switch to headphone mode, or resample the audio to 96 kHz.
It is difficult to judge the reasons for this phenomenon based on the available data, but you can draw conclusions and play it safe twice: output all audio at a sampling rate of 96 kHz, and do not increase the volume to more than 90%.
And a few words about the need to configure foobar2000. In principle, it is possible to output sound to the "DS: Primary Sound Driver" device. In this case, resampling will be performed using Windows (the resampler there is not the worst), and all other sounds will not be turned off (as when playing through WASAPI Exclusive). In addition, by selecting this device, Windows will output sound to the device that is installed by default in the Control Panel, which can be convenient (for example, when you turn off one of the devices, the sound automatically switches to another). So the choice is yours - convenience, or confidence in quality.
6. Resurrecting 3D Audio and Hardware Mixing
And of course I haven’t forgotten about gamers. Since in Windows, starting with Vista, there is no access to hardware mixing of streams (all operations are performed by Windows, and then one single stream is output to the sound card), the developers came up with a special program, analogous to Creative ALchemy, but for Realtek - 3D SoundBack. It connects to hardware resources via the OpenAL interface, emulating for the specified Windows programs, emulating a DirectSound device (as in Windows XP), and then simply converting DirectSound (or DirectSound 3D) commands into OpenAL commands, resulting in real EAX 2.0 in games, as well as the ability to convert multi-channel audio to stereo with surround effects.
To launch the program, open the folder .../Program Files/Realtek/3D Sound Back Beta0.1, in file properties 3DSoundBack.exe on the tab "Compatibility" install Windows Vista SP2 compatibility mode:

Now run this file. To add an application - click Add Game, enter the name and address of the folder that contains the executable file of the program. For example:

After adding, do not forget to highlight the added application and click the button Enable.
Now the specified application will by default use the DirectSound emulated device and will have access to the hardware resources of the sound card:

Epilogue
Well, another great article is completed. By the way, I was thinking: in a good way, this article should have been written one of the first... However, at that time I still would not have had enough knowledge to describe everything in such detail, so it may be to the best.
If something is unclear, or you have any questions, please ask or comment. Good luck!
Information from the sponsor
EuroTekhnika: a chain of household appliances stores. On the website http://euro-technika.com.ua/ you can familiarize yourself with the range of modern 8-core smartphones (using a convenient catalog) and place an order here (with delivery or pickup).
Publications on the topic
-
 The best world of tanks streams on twitch
Stream is a live broadcast of gameplay by a player to the Internet. Through this, many gamers make money, because their fans...
-
 PowerPoint Free Version Review
Microsoft Power Point is a program for making presentations included in the Microsoft Office package. The utility is used to create...