
How to partition a hard drive. Working ways! How to partition a hard drive The disk is not divided into partitions

In this article we will look at how to divide a Windows 7 hard drive into partitions using the capabilities included in the Windows 7 operating system. It will not be a secret to anyone that for this you can use programs that are usually paid, and this is a disadvantage for many users will probably be the most basic.
By the way, so you understand for the future, we will not use axes or other sharp objects to divide the hard drive into partitions. Partition means when you have one physical disk, for example, drive C:/, and in order to create another partition, for example, drive D:/, you need to split it/split it, or, more precisely, pinch it off. That is, when partitioning a disk, we will pinch off a part from it and make another partition of the hard disk from it. Thus, from one physical disk (which can be touched), we will create logical disks (virtual), but in fact, as you understand, this is one hard disk.
So, we're done with the theory, now we can start practicing.
First, open the “Computer Management” window by clicking “Start” - right-click on “Computer” - select “Management”.

Now select “Disk Management”.

This window provides all the information about the hard drives existing in the computer, what logical drives they are divided into and what their capacity is.
In general, this program presents a huge range of possibilities for managing disks; they can be compressed, deleted, formatted and changed drive letters. The only thing I would like to mention is that many of the features will require at least some technical knowledge about the peculiarities of the computer as a whole, so it is recommended that the average user use them as carefully as possible. So that you remember how to partition a disk in Windows 7, you need to perform this procedure a couple of times. This way you will absorb all the information.
On the monitor screen we will see that the program provided us with information about two hard drives (in my case) that are located inside the computer.
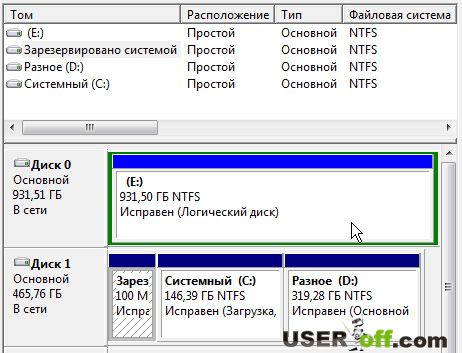
Disk 0 - 931.51 GB and Disk 1 - 465.76 GB. From a school computer science course, many probably remember that in computers the countdown starts not from “1”, but from “0”, which is why the first disk for us is represented as “0”.
Today’s entire article will concern only Disk 0 (the system denotes it with the Latin letter “E”). I would like to note that this disk currently contains data, I will not copy or transfer it anywhere, I will leave everything on this disk, but I will also carry out the necessary operations with it. Let's see what happens with this data.

In order to divide our disk into two logical ones in Windows 7, right-click on it and select “Shrink Volume...” from the drop-down list.

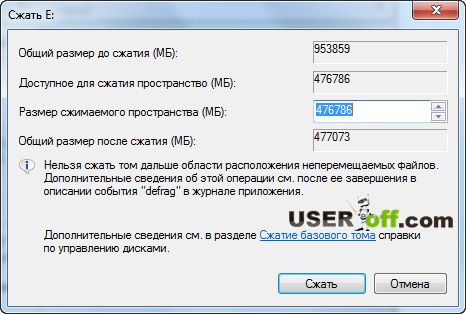
After a few seconds, the system will collect data (“poll” the disk) and present the information to the user.

In my case, “Space available for compression” is 476786 MB, that’s 465.6 GB.
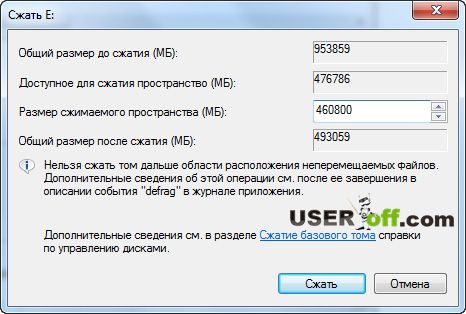
Manually change the “Compressible Space Size” to a value of 460,800 MB (450 GB). Since I want to split the hard drive into two equal sizes, so I specified 460800 MB (450 GB). Now we have indicated how much space we want to pinch off from the “Total Compression Size” (953859 MB).
If you have a 250 GB hard drive, then you must specify a different size accordingly. For example, make one disk 100 GB, and the other 150 GB.
The system will automatically calculate the “Total size after compression” (what remains of the disk) and display it in the corresponding field. In my case, it will be 493,059 MB (481.5 GB).
After such calculations and calculations, you can safely click on the “Compress” button. The process will not last long, but it will be clear, and as many of the readers will notice, this procedure is quite simple.
After some time, another disk will appear, and now one physical disk consists of two logical ones. Look at the screenshot below:

As you can see, the first drive with the letter (E:) remained in our computer, but another one appeared next to it. Now we need to make it visible to us in the “Computer”, and also assign a letter. By the way, go to “Computer” and make sure that this disk is not there. That's how it should be ;).
In order to turn this unallocated partition into a full-fledged logical disk, right-click on it and select “Create a simple volume...” from the menu that opens.

As a result, the “Simple Volume Creation Wizard” window will appear, in which we click the “Next” button.

In the next window, do not change anything in the “Simple Volume Size”, click “Next”.

The third dialog will ask you to specify the drive letter. After this, click “Next”.

You can assign a label to the disk, the same one that will then be displayed in Explorer. We also make sure to select the NTFS file system, check the “Quick Format” box and click “Next”.

In the last window, the system will provide the selected parameters and general information on the new logical drive. Once you have read it, you can click “Done”.

The window will present a new logical drive "G" next to logical drive "E" belonging to the hard drive "Disk 0".

What happened to the data that was on this computer? Everything is fine with them, let's go to the “Computer” and make sure of this.

All! As you understand, partitioning a disk in Windows 7 is not difficult and, at the same time, leaving all the data on this disk safe and sound. I hope that with the help of this article, you have understood how to partition a Windows 7 hard drive.
When installing Windows, the hard drive is traditionally divided into at least two partitions - a smaller system partition with the letter C and a larger user partition with the letter D. This division was not just invented because of someone’s whim, it has important practical value. Firstly, partitioning the hard drive in Windows 7/10 allows you to save the user’s personal files when reinstalling the system, otherwise they would be destroyed during formatting; secondly, it’s just more convenient to work with data, not to mention the fact that This significantly reduces the risk of accidentally deleting system files.
However, some computers and laptops with a pre-installed system have only one partition - the system one, not counting the “System Reserved” area. In such cases, the user has to create additional volumes on the disk himself. This procedure is very simple, however, for beginners it can still cause certain difficulties, especially when it comes to partitioning the partition with the installed system. So how to properly partition a hard drive without losing data?
There are three main ways to partition a hard drive into volumes: using the standard disk management snap-in, using a command line utility Diskpart and with the help of third-party programs created specifically for these purposes. The first method has a number of limitations, the second may seem complicated, the most convenient is the third, using third-party software, but not all such programs are free. Let's consider all three options.
Using Disk Management
So, you have a computer that has only one volume on its disk, not counting the reserved area. First, let's look at how to split a hard drive into two partitions using the built-in Disk Management snap-in. By pressing Win + X Call the context menu of the Start button and select “Disk Management” from it.
In the window that opens, right-click on the area of the system partition with the letter C and select the “Shrink Volume” option from the menu.

After the volume is polled for allocated space, specify the size of the new partition in megabytes in the “Size of compressed space” field and click “Compress”.

As a result, you will get unallocated space highlighted in black. Right-click on it, select “Create simple volume” and follow the wizard’s instructions.

During the creation of the partition, you will be asked to specify the volume size, assign a letter, select a file system (NTFS is needed) and assign a label, that is, the name of the volume displayed in Explorer.


After clicking the “Finish” button, the section will be created.


Partitioning a hard drive in Diskpart
Now let's look at how to divide a hard drive into 2 parts in Windows 7/10 using another standard tool - a console utility Diskpart. Unlike the Disk Management tool, which has a graphical interface, it has a large set of functionality; in addition, you can partition a disk into partitions in Diskpart from under the bootable media, even in a non-working system. So, open a command prompt or PowerShell console as an administrator and run the following commands:
diskpart
list volume
select volume 1
shrink desired=102600
list disk
select disk 0
The first command launches the Diskpart utility itself, the second command displays a list of partitions available on the physical disk, the third selects the partition number corresponding to drive C, the fourth compresses it to the specified size in megabytes. The fifth command displays a list of all physical disks, the sixth command selects the disk to be partitioned (if there is only one on the PC, its ID will be 0).

Let's continue.
create partition primary
format fs=ntfs quick
assign letter=G
exit
The seventh command creates a new partition, the eighth command formats it into the NTFS file system, the ninth command assigns the specified letter to the new volume, and the tenth command terminates Diskpart.

As you can see, the algorithm of actions has much in common with how the partition was created through the built-in Disk Management snap-in. Now, if you go to the “This PC” section, you will see a new logical partition there.
Dividing a disk into parts in Acronis Disk Director
You can also use third-party tools to create custom disk volumes. One of them is Acronis Disk Director– a powerful program for partitioning your hard drive and more. The procedure for partitioning a hard drive in this program is very simple. After launching the application, select the disk to be shared with the mouse and select “Split Volume” from the operations menu on the left.

A dialog box will open in which, using the slider, set the size of the new partition.

If there are user files on the source disk, you can transfer them to the new volume being created, however, this can be done later in Explorer. But system files cannot be transferred, otherwise Windows may not boot. After setting the procedure parameters, click first “OK” and then “Apply pending operations”.


If the system asks you to reboot, give it permission. The program will do the rest itself, you just need to wait for the operation to complete.
How to partition a hard drive in Paragon Hard Disk Manager
Another powerful program for working with disks and partitions. It also has its own wizard for disk partitioning. After launching the application, switch to the “Partition Operations” tab in the main menu and click on the “Partition Wizard” link.


At the next stage, the program will ask you to decide on the size of the new partition. Use the marking slider or enter the desired size manually. Assign a letter to the volume, click Next and confirm the operation.


Clicking “Finish” completes the wizard.

Now, to apply the planned action, click on the button of the same name on the left side of the Paragon Hard Disk Manager window and once again confirm your intentions to partition the disk.

After this, the re-partitioning procedure will start. If the disk is a system disk, you will need to restart the computer.

Disk partitioning in AOMEI Partition Assistant Standard Edition
And finally, let's see how to partition a hard drive in a free program AOMEI Partition Assistant Standard Edition. There is no separate partitioning wizard in this program; repartitioning is performed in two stages. First you need to get some free space. Right-click on the shared disk and select “Change partition size” from the menu.

Drag the slider to set the new partition size and click OK.

As a result, unoccupied space will be created. Select it with the mouse and select the “Create section” option in the menu on the left.

In the window that opens, if necessary, adjust the layout parameters (you can change the size, letter, file system type and partition type) and click “OK”.

Now, to start the staking procedure, click the “Apply” button.

Since you are working with the system disk, you will need to restart the computer.

All of the above methods allow you to partition a hard drive without losing data, however, when performing this procedure, especially with the use of third-party software, you should be careful, since the risk of losing information, although very small, is still present.
It would seem then that there is nothing complicated, formatted “C”, you want to break it into sections, but you want to install the whole system. But this is “C”, but what about “D”? You can’t create a partition without formatting, but I’m not going to format it either, I have data collected on it for almost a whole year.
Why did he give up this section anyway? I started looking on the Internet for information on how I could split the “D” drive without losing data. There are a lot of articles - format and break them up. Or split without formatting using this, this, and this program. In general, everything is as usual.
I won’t burden you with unnecessary information, but will describe it in detail, with pictures. how to partition windows 7 hard drive into sections without formatting it.
Go to the “Start” menu and enter “Computer Management” in the search bar. Select the “Computer Management” tab. A window will open in which you need to click on “Disk Management”.

In the window that opens, right-click on the disk you want to partition. In the window that pops up, click on the line “Compress volume”.
Scanning of free space will begin.

A window with settings will open, that is, you will see how much maximum space you can take from the disk (most likely “D”; you won’t be compressing the volume on drive “C”, where the operating system is located) for the disk you are creating. Feel free to set the maximum value (without going beyond the limits suggested to you), if compression is not possible, then reduce the volume for compressing the partition. Do not be afraid - on the partitioned disk, in addition to your files, after these actions there will also be a lot of free space. Click the “Compress” button.
You will see that there is free space. Right-click on it in the “Create Simple Volume” window that opens. The “Create Simple Volume Wizard” will open. Click “Next”.

Here set the maximum value proposed to you that you have chosen. Click "Next".

Here you will be asked to assign a drive letter. Select the partition letter and click Next.

After selecting a letter, you need to format the created partition. The “Master...” will do all this himself. All that remains is to click “Finish”.
Reboot the computer. All! You have a new partition (new volume). . If you don’t like the name of the partition you created - “New Volume”, then right-click on it and click “Rename”. Just remove the “New Volume” label. The computer will then call it “Local Disk” by adding the letter you assigned.

Well, that's all, now you know how to partition windows 7 hard drive simply and easily. Good luck to all!!!
Today we will talk about how to partition a hard drive in Windows 10: why it is needed, as well as several ways to do it. Increasingly, an advanced computer user, when installing the Windows operating system, decides to split the system or hard drive into several partitions. What is it for? The main goal is ease of use, and most importantly, the separation of working operating system files and personal data, which we in no case want to lose. And this can happen if the system suddenly crashes. Additionally, partitioning your hard drive will help your Windows 10 to run faster.
So, here are some ways to partition your hard drive in Windows 10:
- Using standard operating system tools
- When you install Windows 10
- Using special programs
Now let's look at each of the methods in more detail.
How to create partitions on your hard drive using Windows 10
The main condition in this method of dividing a hard drive into partitions in Windows 10 is that there is enough free space (so that it is no less than what you decide to define for a new one).
- Press the Win+R keys and in the “Run” window enter diskmgmt.msc
- The loading of a special management utility has begun
- After loading it, right-click on the partition that corresponds to the disk we are working with
- Next, select “shrink volume”
- In the window that opens, in the “Partition of compressible space” column, indicate the size that we are going to allocate for a new disk or logical partition
- Select “compress”
- Unallocated space should appear on the right, right-click on it
- You need to select “create simple volume”
- The resulting volume will have a default size that is equal to all free space. We can specify a lower value if, for example, we want to create several logical drives
- Specify the letter of our new drive
- Define the file system (set a new one or leave it as is) and click “next”
- That's it, if the steps were followed correctly, our disk is divided into two
Splitting on the command line
You can also change the disk size in Windows 10 using the command line. This method also applies to the tools of your operating system. Please note that this method will only work when you divide the only system partition into two - for system data and your personal ones. And here's how to create a new volume on your Windows 10 hard drive this way:
- Open command prompt as administrator
- We begin to enter commands in this order: first diskpart
- Then list volume. When this command is executed, pay attention to the volume number that corresponds to drive C
- Enter select volume N. N is the volume number from the previous paragraph
- Next is the command shrink desired=size. Instead of the word “Size”, enter the number in megabytes by which we will reduce drive C in order to divide it into two
- Then list disk. When executing this command, remember the number of the HDD or SSD disk where there is partition C
- The next command is select disk M. M is the number that we remembered in the previous paragraph
- Next, enter these commands in order: create partition primary
- Format fs=ntfs quick
- Assign letter=desired_drive_letter
- The process is complete. You can look in Explorer at the disk partition we created
Acronic Disk Director
This program will also help us expand or reduce the size of the railway. How to use it:
- When you first start the program, select the “manual” operating mode
- A window will open in which we select the section that we will split
- Right-click on it and select “split volume”
- Set the size, then click “OK”
- Click “apply pending operations”
- Restart the computer and click “Ok” again
We talked about how to create a bootable AOMEI PE Builder Live CD. In this article, I decided to tell you how to partition a hard drive using Windows and the free AOMEI Partition Assistant Standard Edition program.
Why share a hard drive at all? Many laptops and computers are sold with an unbroken hard drive, i.e. exists on disk only one sectionC: for the system and data and additional service sections for programs from laptop manufacturers.
There is a saying: “Don’t put all your eggs in one basket.” The same is the case with your hard drive in a computer, where your operating system (Windows XP, 7, 8, 10) and your data (documents, photos, music, movies and other data) stored on one partition Your disk. This is not good, because if there is an error on the C: partition (C: drive), all data on this partition is at risk, including your data. Secondly, when reinstalling Windows, if you have only one partition, you need to copy all your data from this partition to another place, which takes considerable time if the volume is large and there is not always an external hard drive or a large flash drive where this data can be copied. And thirdly, it is always convenient to have two or more partitions (disks) for separation systems and data. In this article, I will tell you and show you how to divide your hard drive into two partitions (drive C and drive D). There is no particular difficulty in this, but you need to be careful, as there is a risk of losing data, but there is always a risk of losing in our lives but if you read this article to the end, everything will become clear even to a child. But it will be better if you create a data backup in advance, as I described how to do this. So let's get started...
How to partition a hard drive using meansWindows
Friends, to partition a hard drive using Windows you need to go to “ Computer management" In Windows 8, to do this, right-click in the lower left corner of the screen and select “ Disk management»
In Windows 7, go to the menu “ Start" and right-click on “ Computer" and in the context menu select " Control", then select " Disk management»
The window “ Disk management" We see that the hard drive of our computer (laptop) is divided into partitions. In this case, into two partitions: reserved by the system (350 MB), on which Windows download files are located, and system partition C: (24 GB), on which the Windows system is installed.
Your disk may be divided into three or even four partitions (depending on the laptop model), this does not change the essence, since these partitions are most likely inaccessible to you and are used for utility programs of laptop manufacturers.
We are interested in section C: (marked in red in the photo), we must divide it (split) into two parts (section C: and section D:)
Don’t be surprised that in the photo I have a small hard drive (25 GB), since I am showing the whole process on a virtual machine where a hard drive of this size is installed, while for you all actions will take place on a physical computer or laptop. But this does not change the process of partitioning the hard drive. All pictures are clickable.
Right-click on section C: and select “ Compress volume...»
The system polls the hard disk volume to determine the space for compression
In the next window indicate the size compressible space in MB, that is, we indicate how much we will compress the partition so that we can then allocate this space for a new disk partition and press the button “ Compress" We mean that the size of the compressed space is indicated in MB (megabytes), so if you want, for example, to create a new partition of 250 GB (gigabytes), then multiply this figure by 1024 (in 1 GB - 1024 MB), we get 250 * 1024 = 256000 MB.
We also take into account that the system may not give us so much space, since it is already occupied by data.
And one more thing: standard Windows disk management tools can become stubborn and not give as much space as you “ask” for, although you have it free. This can be caused by a number of reasons, one of which is fragmentation of data on this partition. In this case, you need to use special disk management programs, one of which I describe Further In this article. Let's read, don't get distracted :)
After compressing the partition, we see that now we have partition C: it has become smaller and additional unallocated space has appeared...
Now we need to create a partition from this unallocated space; to do this, right-click on it and select “ Create a simple volume...»
The Simple Volume Creation Wizard window appears, in which we click “ Further»
We indicate the size of our volume in MB and click “ Further»
Note:
We assign a letter to our new partition (disk). Click " Further»
Let's format our new section with the option " Quick formatting", click " Further»
We see that the wizard has completed creating the volume (partition) with the parameters that we set at the beginning.. Click the button “ Ready»
We see our two partitions in the disk management window: the reduced partition C: and the new partition E:
Voila! Let's go to " My computer"and we see our created additional disk
This is how you can partition a hard drive using Windows, but this method is not always suitable or does not always work properly, so we will look at another option for managing hard drives, this is the multifunctional and free program AOMEI Partition Assistant Standard Edition. With it we will do the same thing and in addition I will show its other main functions.
How to partition a hard drive with a free program
To install the program AOMEI Partition Assistant Standard Edition, go to the official website of the program: and click “ DownloadFreeware»
Click the button " Download Now»
The program will begin downloading to your computer. After downloading, run this file to install
Installing the program is simple, see the screenshots (pictures are clickable)…
To scroll through the pictures, click " Back" or " Forward»
After installation, run the program AOMEI Partition Assistant Standard Edition
We see that the C: partition (C: drive) is large and you can “unfasten” the second partition from it. Usually for drive C: a partition of 60-150 GB is enough, I usually leave 80 GB.
Now what are we going to do. We will shrink the C: drive (change the partition), and use the freed up space for a new partition (D: drive). What do we need for this? This program is both a bubble and attentiveness.
So, right-click on section C: and select “ Resize partition»
Enter a new partition size. To do this, “grab” the right circle of the section with the left mouse button and move it to the left... Or indicate the size of the section in numbers in the field “ Partition size»
About the same as in the photo below. I changed the size of partition C: to 80 GB. Click " OK»
Now in the main program window we see that our disk has unallocated space for a new partition(s). Let's use this 🙂 and create a new partition in this disk space. To do this, right-click on the unallocated space and select “ Creating a section»
We indicate the size of our new partition, the program by default offers all the free space, select the drive letter and click “ OK»
Note: If you want to create more than one partition, then indicate the desired partition less than the recommended maximum, and use the rest of the space for one more partition.
To apply all these actions, you need to click the " Apply»
The window “ Deferred operations", where the program shows what operations it will perform on our hard drive before reaching the final result. If you agree with the actions of the program, click " Go»
The program requires a reboot, agree and click “ Yes»
Well, did you like the free version of the program? AOMEI Partition Assistant Standard Edition?. I like it. In addition to the fact that the program can divide disks, I will list a number of its main functions:
- Migration of the operating system to SSD/HDD drives;
- Increase, change, move, merge sections;
- Copying a disk/partition;
- Creating, deleting, formatting partitions;
- Creating a bootable CD;
- MBR recovery;
- Convert from MBR to GPT disk and back without data loss;
- Partition recovery;
- Disk surface testing;
- Aligning partitions and speeding up disks, especially SSD disks;
- Converting the FAT/FAT32 file system to NTFS
The program supports all types of storage devices: HDD/SSD hard drives with MBR/GPT disk partition styles, RAID arrays, flash drives.
Here is my video on how to partition a hard drive using the free program AOMEI Partition Assistant Standard Edition
Competition “Like - get a key”!
Friends, there is paid version programs, . In the paid version of the program, in addition to the standard functions described above, additional functions are available:
- Converting a partition from primary to logical and vice versa;
- Distributing free space from a partition to another partition;
- Creating and working with dynamic disk partitions;
- Convert a dynamic disk to a basic disk;
- Changing the partition type;
- Changing the hard drive serial number;
- Free technical support
Full list on the page:
It just so happens that I have 3 license keys for the program AOMEI Partition Assistant Pro Edition cost 32 $ (near 1800 R. for May 2015) and I want to arrange for you contest and draw these keys among your readers!
The conditions of the competition are simple:
- You need to click just below on one of the social networking buttons
- In the comments, provide a link to your social network profile.
Summarizing:
June 6, 2015 I'll play these 3 Keys among those who clicked on one of the social buttons. networks (shared information about the draw) and showed this profile in the comments.
I will assign a serial number to each participant. The selection of winners will be determined randomly using a random number generator on the service www.randstuff.ru/number/ .
Each participant will accept no more than one “ Laika” on one social network. There will be three winners. Each person will receive one license key.
The winners of the competition will receive license keys for the program AOMEI Partition Assistant Pro Edition and will be able to fully use all the functions of this wonderful program. Well, have we started? Who is first? 🙂
Publications on the topic
-
 Cheats codes Skyrim for home stop utensils
Building a code system in Skyrim is quite simple, and is already known to fans of The Elder Scrolls series. Let me remind you that to enter codes...
-
 Skyrim animal codes
Using these cheat codes for Skyrim, you can quickly upgrade all your skills and get all the perks. To do this we will need the following...