
How to block a program from accessing the Internet. How to block a program's access to the Internet How to block exit

The Internet is fraught with a lot of dangers, especially for the fragile minds of the younger generation. But few parents manage to protect their child from harmful information through prohibitions and admonitions. 90% of schoolchildren easily deceive their mother and father and continue to visit non-children’s resources.
Adults also “sin” by using the Internet for inappropriate purposes. Mistakes made by office workers often arise because 50% of the time they are busy not with business, but with social networks.
Only one remedy can radically solve the problem - blocking unwanted resources. Read how to block a website from children and careless adults using eight proven methods.
The method of blocking web resources through Hosts, a local database of IP addresses and domain names associated with them, is designed for the most inexperienced. Since even elementary schoolchildren know about Hosts today, for many it will not be difficult to reset the setting and reduce your efforts to nothing. Therefore, you should take measures to protect it. For example:
- Create an account with limited rights for the user you are going to block access to unwanted sites. Then he will not be able to correct anything in the Hosts file even if he wants to.
- Use tricks to hide blocking records.
The blocking technology itself is very simple:
- Log in to Windows using an administrator account.
- Go to the folder %Windir%\System32\drivers\etc, find a file without an extension with the name “Hosts” and open it using Notepad or a program that replaces it. To avoid problems with saving changes, you can do this: launch Windows Notepad (file notepad.exe, located in the Windows folder) with administrator rights, through the menu “File” - “Open” go to Hosts and load it into the program.
- Add an entry anywhere in the file starting on a new line 127.0.0.1 site, where instead of “site” we write the address of the blocked resource.

- Save the file in its original location. To prevent notepad from assigning the txt extension to it, write the name “hosts” in quotes, and select “all files” from the file types.

After this, the site will no longer open in browsers, since the computer will look for it not on the Internet, but on itself.
Tricks that will prevent a user from deleting your entry in Hosts
The first option is to hide the entry itself in the file. It is impossible to make it invisible, but you can insert 2-3 hundred empty lines between comments (lines starting with #) and it. The user, when opening a file, most likely will not pay attention to the scroll bar of the document and will not see your entry, since it will be far down.
The second option is to move the Hosts file to another, more secluded location. Decide for yourself where to place it, but to prevent the system from losing it, you will have to make a small edit to the registry. Open the HKEY_LOCAL_MACHINE\SYSTEM\CurrentControlSet\Services\Tcpip\Parameters branch in the RegEdit editor and in the parameter value DataBasePath write a new path to Hosts.

Via DNS
Traffic from a computer connected to the Internet passes through DNS servers (which, like hosts, map website names to their IP addresses). In addition to the DNS provided by the provider, you can use others, for example, free public ones.
Some public DNS have a content filtering system, that is, they do not load sites with certain content onto the computer.
Unfortunately, you can't block resources of your choice using DNS, but if you want to block access to adult content or potentially malicious websites, the method is very effective. To use it, you just need to specify the required DNS addresses in the connection and protocol properties of the IPv4 version.

This example uses Yandex public DNS with an adult content filter.
There are other blocking options:
- Yandex: 77.88.8.88 (main) and 77.88.8.2 (alternative) - filtering phishing and fraudulent resources.
- Norton ConnectSafe (Symantec): 198.153.192.40 (primary) and 198.153.194.40 (alternate) - filters phishing, fraud, malware.
- Norton ConnectSafe: 198.153.192.50 and 198.153.194.50 - the same plus an adult content filter.
- Norton ConnectSafe: 198.153.192.60 and 198.153.194.60 - the same plus blocking of any “inappropriate” topics.
In browsers
Modern browsers contain a lot of useful things, but most of them do not have functions for blocking sites of the user's choice. It remains, perhaps, only in Internet Explorer.
To make the ability to block sites appear in your favorite browser, just install a special extension in it, for example, Block Site. This link leads to the Chrome store, from where you can download such a plugin (not just one, but three with a similar name) for Google Chrome and Yandex Browser.

The principle of operation of such extensions is very simple. They add a blocking feature to the context menu. By right-clicking on any link (including a file download link) and selecting the “Block” command, you will blacklist the site. And the whole thing, and not a separate page.

Some of the presented extensions also allow you to manually add to the blacklist and create custom filters for blocking by content.

Plugins with web resource block functions are produced not only for Chrome, but also for Opera, Mozilla Firefox and other less popular browsers.
Using Windows Firewall or a third-party firewall
Windows Firewall can only block websites based on IP addresses. This is not the best way, since one IP is sometimes shared by several resources, and large portals such as VKontakte and Odnoklassniki occupy entire address ranges. Third-party firewalls can be configured more flexibly - they allow you to block access to even a single page. To do this, it is enough to indicate its URL in the program, not its IP, which is much more convenient for the user.
Since each firewall is configured differently, and we cannot consider all of them, we will study the principle of setting up a universal tool - the Windows 10 firewall.
To create a blocking rule, we first determine the site's IP. To do this it is convenient to use the command ping_URL(for example, “ping ya.ru”) or whois services.

- Let's open the firewall. In the left panel, select “Outgoing Connection Rules”, and in the “Actions” list, select “Create Rule”.

- In the next window, check “All programs” (if the site should be blocked in all browsers) or “Program path” (if in one). When choosing the second option, we will indicate the path to the browser executable file.

- We'll skip the next window. After it, we have to indicate the IP to be blocked. At the bottom of the “Area” window, select the “Specified IP addresses” item and click “Add”. We do not touch the top field, since it is intended for creating rules in local networks.

- Enter the IP address or range of website addresses and click OK.

- Next, select “Block connection”.

- Let's mark the network profiles for which we are going to use the rule.

- The last step is to give the rule a name.

After clicking “Finish” the rule will take effect.
On the router
Access control settings on routers of different models are not the same, but their algorithm is largely similar. Let's figure out how to block access to unwanted sites using TP-Link as an example.
TP-Link access control (and not only) works in black and white list mode. In the first case, access is allowed to any web resources except those specified. In the second, it is prohibited to apply to everyone, except, again, those indicated. Let's consider creating a blacklist as an example, since it is used more often.
- Go to the admin panel, open the “Access Control” section and click “Setup Wizard”.

- In the new window, select the “IP address” mode, indicate the name of the host for which we are creating a rule, and enter its IP or address range.

- Next, select the “Domain name” mode, write an arbitrary target name (for which a rule is created) and list the prohibited sites.

- The next step is to create a blocking schedule.

- Then we set the name of the rule, check all the parameters and click “Finish”.

- The last step is to select a filtering mode (in our case, prohibit packets from the specified domains from passing through the router) and save the rule. Also, don’t forget to check “Enable Internet access control management.”

This completes the setup.
Parental controls
Parental controls are now being built in wherever possible. It is found in many routers, antivirus programs, and even in the operating systems themselves. Before Windows 7, parental controls were a separate system feature. In Windows 10, it became “family safety with settings via the Microsoft website,” but its essence did not change. Parents still have the opportunity to use it to limit their child’s access to network resources.
However, what are we all about Windows and about Windows? Let's look at how parental control works in Kaspersky Internet Security.
- Restrictions are configured through a specially designated section.

- The first thing you have to do after entering it is to set a password to disable the function and change settings.
- Next, you will see a list of user accounts for which you can enable parental controls. Click “Set up restrictions” next to the selected account.

- Restrictions on access to web content are set in the “Internet” section. There are 2 blocking modes: sites for adults (black list) and all sites except permitted ones (white list).

- When you select blacklist mode, you can specify categories of content to be blocked, but without specifying specific sites. When selecting whitelist mode, allowed sites must be added to exceptions. Everything else will be blocked.

The control on/off slider is located at the top of the settings window in the user list.
Using static routes
A static (permanent) route is a rigidly defined path for packets to follow from one network node to another. For example, from your computer to the server that hosts the website. By registering a false route to an Internet resource (more precisely, to its IP address) in the Windows registry or in the router settings, you will prevent it from opening.
How to do it:
- Define using the command ping_URL IP address of the desired site.
- Without closing the command line (it must be launched as administrator), run one more instruction: route -p add destination_site_IP mask 255.255.255.0 192.168.1.0 metric 1.

The answer “Ok” means that the route to the site 213.180.193.3 has been created. Now ya.ru will not open on this computer.
In the Windows registry, all static routes are located under HKEY_LOCAL_MACHINE\SYSTEM\CurrentControlSet\Services\Tcpip\Parameters\PersistentRoutes.

To remove an entry from there that has become unnecessary and resume access to the site, right-click on the entry and select “Delete.” Or run the following instructions on the command line route - f. The last method removes all existing persistent routes. If you want to remove only one of them, run the command route delete target_node_IP, For example, route delete 213.180.193.3. After this, the ya.ru website will become accessible again.
Using local IP security policies (IPSec)
Using IP Security Policy (IPSec) to restrict Internet access is a non-trivial method. Very few people know about the existence of such a possibility (unlike Hosts), and anyone for whom you block a certain web resource will never guess how you did it.
Using IPSec, you can block both an individual IP site and a pool of addresses. The only drawback of this method is that the policy management snap-in is not available in all editions of Windows. So, it is absent in home releases.
Creating an IP security policy may seem complicated, but only the first time. After several attempts, it will not take you more than 2-3 minutes. Moreover, every step of the setup is accompanied by a Wizard.
- So, to access the snap-in, open Administrative Tools in Control Panel, click Local Security Policy, and select Local PC IP Security Policies.
- Right-click on the empty area on the right half of the “Local Policies” window and select “Create IP Security Policy.” The first Setup Wizard will launch.

- In the window that opens, enter the name of the new policy and briefly describe its purpose. You can leave these fields as default, but it’s better to fill them out so you don’t get confused later.

- Then click “Next” without changing anything.

- Complete the Wizard by checking “Edit Properties” and clicking “Finish.”

- In the properties window for the future IPSec policy, click “Add”. This will launch the next Wizard - creating IP security rules.

- In the “Tunnel Endpoint” window, leave everything as is.

- Under Network Type, select All Connections.

- In the “List of IP filters” (they just need to be created), click “Add”. Next, give your list a name and click “Add” again. The third Wizard will start - IP filters.

- First of all, give the new filter a description (it’s most convenient to specify the URL of the site to be blocked).

- Specify “My IP address” as the traffic source.

- Destination: “Specific IP or subnet.” Below, write the address of the site or subnet to be blocked.

- In the “Protocol Type” section, check “Any”.

- The last step is to click “Edit Properties” and “Done”. There is very little left.

- Confirm the new filter settings.

- If you want to create another one, click the Add button in the next window. Otherwise, click “OK”. This will launch the Filter Action Configuration Wizard.
 In the “List of IP filters”, mark the one you just created and click “Next”.
- Give a name and description of what it will do (block the site).

- In the action parameters, specify “Block”.

- The final step of the stage is “Changing properties” and completing the wizard.

- Now check and confirm the setting again.

- The final push is to create safety rules. The fifth Master will do this.

- When it’s finished, change the properties again and click “Finish.”

- Review and confirm the parameters of the new rule.

- And finally - all the properties of the policy. It has been created and is displayed in the section list.

- All that remains is to put the policy into effect. Right-click on it and select “Assign”.
 In the “Properties” section you can later change any policy settings, and through the context menu you can disable, rename and delete.
Often, users do not search the Internet for information on how to block an application from accessing the Internet. Usually everyone wants programs downloaded to their computer to have normal access to the network and access the Internet without problems. Still, there are times when some application needs to block access to the Internet. If you found this instruction, then you already know why you need to disable the Internet for individual programs. Below you will find a description of how to do this.
Warning Note: If you do not have an Administrator password or an account with Administrator rights, you will not be able to complete all of the steps in this guide.
Another warning: These instructions provide changes to the settings of the Windows Firewall, also known as the firewall. We recommend that you do only what is described in the article and refrain from mindlessly changing various firewall settings if you do not understand what you are doing. Such practices can lead to damage to the operating system and its incorrect operation.
How to prevent a program from accessing the Internet in Windows 10
The firewall built into the system is responsible for issuing Internet access permissions for all applications on your computer. This is where you need to create a rule to block access. This is done as follows:
- Click Win+R and in the window that appears Execute enter control. This command launches the classic Control Panel, which Microsoft tries to hide deeper in each subsequent Windows update.
- Go to the tab system and safety.

- Then open a subgroup Firewall Windows.

- On the left side of the screen, click Extra options. A little tip: instead of wandering around the Control Panel, you can go straight to the Windows Firewall management interface. To do this you need to click Win+R and enter the command wf.msc.

- A window will appear Firewall Windowsin enhanced security mode. On the left side, click on Rules for outgoing connection.

- On the right side of the screen, click Create a rule.
- The firewall will open the Create Outbound Rule Wizard. The first stage is choosing the type of rule. Since you need to block the application’s access to the Internet, select the first option - For the program. Click Further.

- The next step is to specify the path to the executable .
exe- application file. Click Review and in Explorer, find your application.

- Please note that despite selecting an application on the disk C, the system registered the path using variables in the form % SystemDrive% . You need to change this to the normal path, otherwise the rule may not work. In previous versions of Windows there were no problems with this, but now there is, sad but true. Instead of % SystemDrive%\Xiaomi\XiaomiFlash\XiaomiFlash.exe the path should look like C:\Xiaomi\XiaomiFlash\XiaomiFlash.exe. In exactly the same way, you need to correct the path if you use % USERPROFILE% . Of course, instead of folders with program files for flashing Chinese phones, you will have the path to the application for which you are going to disable Internet access. The main thing is to change the variables at the beginning of the path.
- Next, you tell the firewall what to do with the connection. Select the last option - Block connection. Click Further.

- On the next screen, specify the profiles to which the created rule will be applied. Leave all three checked so that the application does not access the Internet if your computer is connected to another network. Alternatively, you can make sure that the application does not access the Internet only on public networks. To do this, leave a mark only next to Public. By analogy, you can make other combinations. To prevent the application from accessing the Internet on your home network, leave only Private.

- The last task is to provide a name and description for your rule. Name it so that it is easy to find and delete or change later.
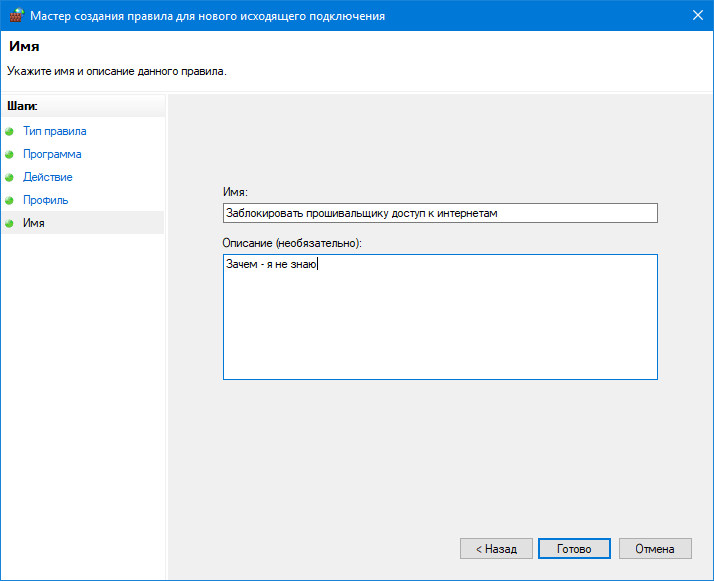
- Click Ready.
After this, the rule will be saved and will be displayed at the top of the list of rules for outgoing connections. All saved rules take effect immediately.
How to allow an application blocked by a firewall to access the Internet
You can also allow the connection by double-clicking the left mouse button on the rule and in the section Action tabs Are common choose Allow connection. Then click OK. In the same way, you can edit the parameters of the created rule.
Another option is to remove the rule completely. Just click Delete in the right side of the firewall window, after selecting your rule to block Internet access.
To block access to the Internet, firewalls are used - so-called firewalls or firewalls. Starting with the ruler Windows XP/Windows 2003, Microsoft began to build software firewalls into its operating systems. However, the implementation of Windows firewalls is far from perfect. Its limited functionality makes it necessary to use products from other developers to ensure security.
This article will discuss the use case IPSec to implement a firewall. IPSec allows you to implement many tasks performed by an “advanced firewall” using standard Windows OS tools.
Task No. 1 - ban all Internet traffic on the local machine
You need to create a policy IPSec, prohibiting all data exchange via protocols HTTP And HTTPS.
Images of dialog boxes and sequence of actions will be shown using the OS as an example Windows 2003. For Windows XP And Windows 2000 the differences will not be significant.
You need to open the console MMC:
Start - Run - mmc
Select the command from the menu:
Console.
In the dialog that opens, select:
Add .
In the next computer selection dialog box, specify:
Local computer.
Sequentially close windows by pressing buttons
Ready, Close, OK.
A node has appeared in the left panel of the console IP Security Policies on 'Local Computer'.
After right-clicking, select the command...
In the dialog that opens, click the button Add.
The next dialog box will be - List of filters.
To make it easier to work with the list of filters, you need to fill in the field Name. For example, HTTP, HTTPS.
Press the button Add to create a filter. If you do not uncheck Use wizard, then the creation process will be accompanied by a filter creation wizard.
You can skip its first page by clicking Further. On the second page you must specify a description of the filter. One filter can consist of many others. It is advisable to create two filters sequentially - one for HTTP, another for HTTPS. The merge filter will consist of these two filters. To do this:
Specify in the description field HTTP. Checkbox Reflected leave it enabled - this will allow you to distribute filter rules both in one direction of packet forwarding and in the opposite direction with the same parameters. Click Further.
In the next dialog, you must specify the IP traffic source address. The choice of address is quite wide.
In this case, you must indicate My IP address and press Further.
In the next window, the destination address is specified.
Choose Any IP address and press Further.
Then the protocol type is specified.
Select from list TCP.
Then the port numbers are specified.
Leave the top switch in position Packets from any port, and the lower one into the mode Packets to this port and enter the HTTP port value in the field - 80 .
Click Ready, closing the wizard.
The created filter appears in the lower list window.
Do the same operations for the HTTPS port - 443 . The result is in the picture below:
Press the button OK. The filter has been created.
It is necessary to determine the actions that it will perform.
Switch to bookmark Managing filter actions and press the button Add.
The wizard dialog will open again - click Further.
Specify a name, for example Block, and press Further.
Select radio button as action Block, press Further And Ready.
Now you need to create a policy and assign it.
In the MMC console window, right-click the node IP Security Policies and select the command.
Uncheck Use default rule, press Further And Ready.
In the policy properties window, click the button Add.
Network type - specify All network connections and press Further.
Select the created filter HTTP, HTTPS(a dot in a circle should appear on the left) and press the button Further.
In the same way, select the action for the filter - Block Web, press Further And Ready.
The created policy named BlockWeb.
To enable a policy, right-click on the name and select the command Assign.
To check, launch your browser. If everything was done correctly, the picture should look like this:
Task No. 2 - adding permitted zones
To add the ability to visit certain sites, you need to add a filter to the created policy.
For example, you need to allow the browser to view the node.
To do this, in the MMC console, double-click the policy name BlockWeb.
In the properties window, click the button Add, then double-click to select a filter HTTP, HTTPS.
On the tab List of filters press the button Add.
Specify a name for the new filter, for example, website.
A warning will appear that the filter contains www..222.31.146 instead of the DNS name. Agree by clicking the button Yes.
Then indicate the protocol type - TCP, select radio button To this port and indicate its number - 80 .
Then you need to determine the filter action - go to the tab of the same name and select the parameter Allow.
Now the policy consists of two filters - one denies all http traffic, the other allows connections to a specific IP address. It all looks something like this:
All that remains is to close all dialog boxes and check the filtering.
Now, when you go to (and only!) the browser should display the contents of this node.
In the same way, you can create your own necessary filters and apply them.
The following was used to write this article:
It is impossible to imagine the number of sites located on the vast expanses of the World Wide Web. Naturally, the topics of information resources are very diverse, because everything that takes place in real life is reflected on web pages.
There are issues that are inappropriate, indecent or illegal to discuss, just as there are sites that viewing is undesirable or prohibited:
The forbidden fruit is always sweet, but its consumption leads to disastrous consequences. The restrictions do not always have to be the same for everyone, because the same information may be perceived differently by different visitors. That is why the question of how to block a site for a certain group of users comes up head on.
But decisions to restrict access to information resources are made by people, and their opinions do not always completely coincide with common sense. Therefore, the question of how to access blocked sites is no less pressing. All this will be discussed in this article.
Who should be blocked?
Limitation is a rather relative concept. Access to some resources is blocked only for a certain group of people or at a certain time. To deal with this, it is necessary to identify categories of people for whom prohibitions can be introduced. It is also worth mentioning those who introduce these restrictions.
- He is his own director. Everyone understands that it is necessary to achieve self-discipline, but few know how. Blocking access to a site whose constant visits interfere with productive activities is a radical, but correct decision. People who learn to say “no” to themselves usually achieve what they set out to achieve;
- Children don't care about everything in the world. Wise parents will worry about how to block unwanted sites for their child. Prohibited topics are an individual choice for everyone. Some people don’t want their child to get involved in online games, while others are against fighting without rules. But, as a rule, the restriction only applies to adult sites with known content;
- Do business during working hours. There are, of course, boss animals who demand absolute silence and hands folded on the table. But in most cases, restrictions begin to be introduced after regularly observing the following picture: employees with all their appearance demonstrate hard work, but instead there is intense correspondence or viewing of entertainment sites on the computer;
- To all the inhabitants of this country. There are information resources whose content forces domestic government agencies to introduce bans. These blocked sites are not available in Russia, but may be officially allowed in other countries.
The state is on alert
In our country, Roskomnadzor is responsible for online censorship, and weekly updates the list of blocked sites. If a resource is related to one of the following topics, then it has an excellent chance of being among the prohibited.
- Promotion of drug use. The population must be healthy, so the state carefully monitors any attempts to encourage terrible addiction;
- Racism and extremism. If an information resource incites hostility and stimulates aggression, it must be included in the list of prohibited ones;
- Pornographic materials in the creation of which minors participated. Children should not take part in the operation of the adult industry;
- Suicides. Materials that develop suicidal tendencies in people with unstable psyches are, of course, included in the list of unacceptable;
- Information published without copyright. At one time, some people took care to legally record their own achievements, and the law should apply everywhere, including on the Internet;
- Topics that are prohibited due to government policy. Intrigues at the highest level are a topic that can hardly be covered within the framework of this article, so the only thing that can be done is to accept everything as it is.
The list of sites blocked by Roskomnadzor can be viewed by entering the appropriate query in a search engine:
You can also use the official resource at: eais.rkn.gov.ru:
Familiarization with the list of prohibited resources will help prevent the use of unwanted phrases on your web pages. When viewing the registry, you should pay attention to why the site’s content is blocked, because very often one of the topics described above is mentioned accidentally or in a figurative sense.
If the owners of the web resource eliminate the misunderstanding, the site is removed from the list of prohibited sites without any consequences. It is important to learn from the mistakes of others, which predecessors made in huge numbers.
How to block access?
As has already become clear, access restrictions are introduced for different numbers of people ( from one to all). That is why a variety of locking mechanisms are used, and some of them are given below.
- Block access to unwanted site(s) on a specific computer. There are many ways to restrict access for one user. You can use the browser's capabilities or slightly edit the contents of the hosts file in the etc folder. How to get there and what to do next will be described in more detail below;
- Blocking unwanted IP addresses on the Internet gateway. Using this method, you can deny access to sites for many users at once;
- Changing proxy server settings. You can prohibit the use of certain words in site names, thus covering a wide range of unwanted resources;
How to block a website on your computer
Let’s imagine that you are terrified of annoying VKontakte, which prevents you from doing really important and useful things. So you decided to cut him out of your life. The impulse is worthy of respect, you just need to know how to act correctly.
If you enter the magic vk.com into the address bar of your browser, we will see the usual picture:
In order to block a site on your computer, you need to know how to log in as an administrator. To do this in Windows 7, you need to go to the “Start” menu, right-click on “Computer” and go to “Management”. The following window will open:
Let's move on to " Local users" - "Users" - right-click on "Administrator" and select "Properties":
In the window that opens, uncheck the “ Disable account"and close all windows.
Go to “Start”, look for “ Shutdown" and click " Change user" Having logged in as an administrator, go to drive C, look for the Windows folder there, go to system32, find the drivers folder, and in it select the etc directory. We need a hosts file:
Open it in notepad:
In order to block access to a site, enter its domain name and write the following construction in front of it:
Now an attempt to kill time will be met with an obstacle in the form of a white screen. You can, of course, go around the rules and set all the settings to their original state, but here you should rely on all-conquering laziness.
How to access a blocked site
There are people who come up with and establish prohibitions, and there are those who violate these prohibitions. Restrictions are not always fair, and very often users quite reasonably want to be able to access one or another prohibited site.
To open blocked sites, you can file a lawsuit, but if access is required immediately, other methods and means are used. Below are just a few of them.
Hello! Several times already I have come across questions like how to block access to certain sites, or how to set up parental controls on a Wi-Fi router. If you need to block access to certain sites, or, conversely, allow access only to certain sites and you use a Wi-Fi router to access the Internet, then you can set up parental controls directly on the router.
You can block certain sites using the antivirus that you have installed (if it has a built-in firewall), or in the hosts file, which you can read about. These methods are good when you connect to the Internet directly, via cable, or wireless modem.
But if you connect to the Internet via a Wi-Fi router, then you can use the function built into it Parental Control. I don’t know how it is on your router, but mine has such a function, so we’ll set it up.
What is the advantage of parental controls at the Wi-Fi router level? First of all, it is the ability to create site access rules for each computer or mobile device that connects through an access point (devices are recognized by MAC address). You can also deny access to certain sites, or allow only some for all devices that work through the same router.
What can I tell you, now I’ll show you everything with an example :).
Setting up parental controls on a Wi-Fi router
In the control panel, go to the tab Parental Control. First we need to enable parental controls. To do this, opposite Parental Control, set the switch near Enable.
Now we need to set the MAC address of the host computer, which will control access to sites. MAC Address of Parental PC enter the MAC address of this computer. And if you entered the settings from the computer that will be the main one, then just click the button Copy To Above. And press the button to save Save.
We have enabled parental controls, now you can add sites that you want to block, or only those that you want to open access to.
On the same page, click the button “Add New...”.
On a new page we create a rule for accessing sites.
Creating a rule for accessing sites
Against MAC Address of Child PC: specify the MAC address of the device to which this rule will be applied. Below in paragraph All MAC Address In Current LAN: you can select one of the MAC addresses of a device already connected to the router. And if you do not specify the MAC address and leave the top field empty, then the rule we created will be applied to all devices that connect to the router, but except for the parent device, the MAC address of which we specified when enabling parental control.
For the experiment, I specified the MAC of my phone.
In point Allowed Domain Name: we can specify eight sites to which you can deny or allow access. It is not necessary to indicate the full address, for example https://www.google.ru. You can only specify the word, for example google. And this means that access will be denied/allowed to all sites whose address contains “google”. For example, to the mail https://mail.google.com.
Paragraph Effective Time: We allow you to manage access time, but I did not configure it.
Now attention! Against Status can choose Enabled, or Disabled. If you set Enabled, this means that access will only be allowed to those sites that we specified above. In my case, to google.ru and all its services.
To save the result, press the button Save.
Let's check the result. On my phone, only sites whose address included the word “google” were available. When trying to access other sites, an error appeared.
Publications on the topic
-
 How to put a comma on a laptop keyboard
Putting a comma on a regular keyboard or laptop is very easy. Another thing is where exactly in the proposal to add it, so that there is no...
-
 How to type Roman numerals on the keyboard?
We don't often use Roman numerals these days. However, sometimes such a need arises, for example, when we need to specify...