
Remove the cooler from the processor. How to disassemble and clean the cooler of a computer and laptop from dust. How to remove the cooler and how to install the processor and cooler. Proper installation

Welcome friends to my website, today we’ll talk about the cooler. We can say that every personal computer user knows what a cooler is and almost every user had to remove the cooler to clean dust or install a new one. Let's look at the process of how to remove the cooler, how to install the cooler and processor.
A cooler is a radiator designed to cool a heated device. It consists of thin metal plates and a fan.
When the processor is loaded, the plates heat up; the air flow directed by the fan cools these plates, thereby preventing the system from heating up.
Coolers are different: noisy, silent, weak, powerful. Basically, the quality of a cooler is assessed by noise levels. A good cooler is considered to be one whose noise level fluctuates in the range of 20 decibels, it’s like listening to a person speaking in a whisper at a distance of 1 meter from you.
Cooler removal process
This article will be useful especially for beginners when cleaning the cooler from dust, which must be done at least once a month, and when replacing thermal paste.
Before you begin, you must completely disconnect the processor from the power source. Each system unit has a removable cover on the side; unscrew two screws on the rear panel and remove the cover.
As we said above, coolers vary not only in power and comfort, but also in appearance. Some models are attached to the motherboard using one latch, while others sit on four legs, see the picture below
In my case, the cooler is attached to one latch. Carefully remove the cooler and disconnect the wires. In particular, when removing the cooler, the processor underneath gets stuck and is removed along with the cooler.
We separate the processor from the cooler carefully without sudden movements. Make sure that the legs on the processor are not deformed in any way, otherwise the computer will not turn on.
Now you need to clean the cooler from dust. To do this we need a brush or compressed air. You also need to check the thermal paste on the cooler; if it is completely dry, then you need to change it to a new one to avoid overheating the system.
Cooler installation process
The first thing you need to do is install the processor. Here you need to be careful and very careful. The process and the processor socket have markings to help you place the processor correctly. Let's look at the picture
Raise the handbrake to 90 degrees, insert the processor and lower the handbrake to its previous position.

Do not press on the processor under any circumstances, otherwise you will deform the micro-leg on the processor. If for some reason you have deformed the leg, there is no need to panic, we will try to correct it to its original place. We take the processor and look at the row of legs where we made the deformations, and try to make sure that the leg does not stick out from the row of other legs. We carry out this process on the other side as well. If you don’t understand what we’re talking about, write in the comments.
Now we have put the processor in place. Now you need to install the cooler, fixing the processor in the center of the cooler.
If you did everything correctly, the cooler sits down smoothly. When installing the cooler, do not apply pressure under any circumstances, otherwise the processor will be damaged.
The final finishing touch is to connect the wires to the fan to the same connector.
That's it, friends, now you have in your hands competent instructions on how to remove the cooler, how to install the cooler and processor.
If something doesn’t work out for you or you have any questions, write in the comments. I hope the information was useful until we meet again!
Powerful processor this is comfort and convenience when using a computer. It happens that when buying a computer or laptop, people incorrectly choose a CPU that is slower than necessary to solve their problems. This usually happens because of savings and hope for further computer upgrade(when the money is available), or simply due to lack of knowledge. But even if a top-end CPU was purchased, within a few years it becomes obsolete, and the processor’s performance is no longer sufficient to solve the tasks assigned to it. In this case you can do computer upgrade: replace processor . In this article we will talk about how to remove the cooler and replace the processor on a regular desktop computer. Such upgrade using a laptop is quite difficult, and sometimes even impossible. Even if your notebook model allows such an upgrade, then instructions for replacing the CPU specifically for your model must be found on the Internet.
Processor replacement procedure Overall simple and unpretentious:0. Disconnect power from the system unit! Disconnect all wires from it!
1. Open the system unit;
2. Remove the cooler from the CPU;
3. Open the socket with the processor;
4. Replace the processor;
5. Close socket;
5. Apply a layer of thermal paste to the new processor;
6. Install the cooler.
How to open the system unit: This is usually done by unscrewing several screws around the perimeter of the rear panel of the system unit. Modern case models Increasingly, thumbscrews are being used, which don’t even require a screwdriver to remove. Don't rush to unscrew all the screws! Most likely, it is possible to remove only one side cover, behind which there is full access to all components of the system unit. In order to remove the side panel (or the entire casing), you need to slightly move them in the direction from the front/front panel to the rear wall (literally 1 centimeter). After which the element to be removed can be easily separated from the chassis. So, we've dealt with the body... Lay it on its side to make it easier to work with.
How to remove the cooler: There are many variations possible in this step. It all depends on the installed cooler model. Typically, the dismantling method should become clear after a visual inspection. We recommend that you perform these operations in a sufficiently free space where you can rotate the entire computer case to a more comfortable position without interference.
If the system is equipped Intel CPU and the most popular standard solution for cooling it is quite simple. You need to turn the 4 plastic pins with a flat head in the direction indicated by the arrow on their “caps” and pull up slightly. After these manipulations with each of the pins you can , also gently pulling it up.
If your system unit is equipped AMD CPU and box cooler, then find one or a couple of “levers”, which need to be “thrown” to the other side. After this, the bracket pressing the radiator will loosen and allow you to “throw off” its ends from the hooks on the socket (CPU socket), after which you can remove the cooler from the processor.
In the case where a non-standard solution for cooling the CPU is installed, then most likely you will need a screwdriver with which you need to remove several screws (usually four) holding CPU heatsink. It is quite possible that there will be an additional frame on the back side of the motherboard to prevent the latter from bending. You can see examples of such “non-standard” fastenings in the photo above. In the most difficult cases, it may be necessary to remove the video card or even the entire motherboard from the case, but this is quite rare. Such systems are usually used by enthusiasts who like to indulge in extreme overclocking processors and video cards. So, if you have never removed the cooler and are not an IT enthusiast, then 90% of your system is equipped with a standard CPU cooling solution, and there should be no problems with removal.
Additionally, let us only pay attention to the fact that between the heatsink and the processor there must be a layer of thermal paste, which could already dry up, as a result of which the CPU and radiator may stick together a little - in this case, after unscrewing (unfastening) the cooler, you need to apply some force when removing it. Additionally, you can try to slightly rotate the radiator relative to the processor - this may make it easier to peel off the cooler. If the thermal interface has not dried out, then it is very gets dirty– take this point into account and have a rag or hand wipes on hand.
How to remove the processor: you need to release it from the socket by raising the lever, pressing either the processor itself (Intel) or clamping its legs into the holes with contacts (AMD). Be careful with the removed CPU; do not drop it. If a CPU without legs falls onto a soft floor, nothing bad should happen - the processor should not break. If there are legs on the bottom side, they may bend and you will have to straighten them. If you drop the processor on a tiled or granite floor, then it is quite likely that the crystal substrate, which contains hundreds of very thin conductors, will chip. In the latter case, the processor can be thrown away - it cannot be restored. All in all - be careful!
New powerful processor installed into the socket in exactly the same orientation as the old one. For Intel CPU There are usually a pair of “dimples” at the ends of the CPU substrate and corresponding protrusions in the socket. AMD processors most often they have a marked corner, which is indicated on top by a white triangle and have a bevel in the “pattern” of the contacts on the bottom side. After correct positioning of the CPU, insert it into the connector and clamp it using the existing lever.
After you replaced the processor, it is necessary to apply a thin layer of thermal paste on it (on the surface in contact with the radiator) and install cooler. Please note that powerful processors usually generate significant heat and must be cooled with an appropriate cooler to avoid overheating and failure. Modern CPUs, of course, are equipped with temperature sensors and can reduce their power consumption (and heating), but this comes at the expense of reduced performance... and you replaced the processor to a more powerful one to increase speed! As a final step, don’t forget to connect cooler power supply to the corresponding connector on the motherboard ( CPU_Fan), close the system unit case and screw back the screws that were unscrewed in the first step.
Taskmanager on an 8-processor server with Intel Xeon E7-2870.We recently talked about fastest processor for desktop systems: . Its installation in a socket on the motherboard can be done according to the instructions given above. Please note that powerful CPUs generate a lot of heat, so it is better to purchase a good cooler for such a “monster”, which will be more productive than a standard / boxed one. This will protect your new one. powerful processor from overheating and save yourself from the annoying noise of the high-speed fan of the standard cooling system.
What is a computer processor? Many PC users, and especially beginners, refer to the entire system unit as a processor. And this is not at all true. A processor is a small part (slightly smaller than a matchbox) of a computer, which is located in the system unit and attached to the motherboard. Its main task is information processing. The more powerful the processor, the faster the computer works (“thinks”).
Many of us constantly argue over one important question: what is the most important part in a computer? Some argued that this is the keeper of all information - the hard drive, others talked about RAM, without the presence of which we would not be able to manage the files located on the hard drive. But the answer to this question lies on the surface and is very simple. The most important, integral part of a computer is the processor. Thanks to the operation of this block, we can synchronize each installed device in the computer, and their stable and correct operation depends entirely on the performance of the processor. But in the end, the processor, like any other element of the computer, outlives its intended time, and the time comes to replace it with a more advanced one.
Processor removal instructions
In order to learn how to remove the processor, you must carefully read this mini-instruction:

1. First, disconnect the system unit from the network (in the photo it is the even power cable). But it is better to disconnect all connected devices and place the system unit on its side, since in this case it will be more convenient to work.
Don’t forget: you just need to disconnect the computer from the network by unplugging the power cord from the outlet.

2. Then you need to remove the side cover from the case.


3. Disconnect all connecting wires to the processor and fan. These wires give them power.

4. Remove the fan with radiator - the cooling system.

5. Now you can remove the processor, but first of all, you need to inspect its design. As a rule, fastening methods are made in the form of clamping levers located on both sides. When pressed, they begin to move away from each other, thereby freeing the processor from the entire structure. There is also a clamping lever on the processor itself; it should also be removed, after which we remove the processor.
6. Install the processor in reverse order. Please note that if the processor is in the correct relative position above the socket (its place), it should fit there without any difficulty. Then secure it with a lever.
7. It should be remembered that before installing the cooler and radiator, it is necessary to apply thermal paste to the surface of the processor, which will reliably protect it from all kinds of overheating.
The process of removing the fan from the processor

Dust is the main enemy of a computer; fans most often suffer from it. Typically, a computer has three fans. One is on the video card, the second is in the power supply, the third is a fan that cools the processor. If it becomes heavily clogged with dust, the cooling rate of the processor will drop significantly, which will affect the performance of the computer.
First you need to understand the type of fastening. There are two types: latches and screws. If it is a latch, pull back the two levers and remove it. When fastening in the form of a screw, you need to use a screwdriver, carefully unscrew and remove the fan. As a rule, the processor cooling system consists of a fan and a radiator and is a single collapsible unit.

A heatsink exists to dissipate the heat generated by the processor. Over time, the radiator loses its properties due to dust accumulated on it and also needs to be removed and cleaned. Before removing the heatsink from the processor, you need to determine what type of mounting it is, they come in the following types:
- on latches using a clamping bracket or pistons (the most common fastening);
- on hot-melt adhesive (mostly found on inexpensive devices).
If the radiator has a piston fastening, then the process of removing it will not be difficult. You need to squeeze the antennae of the piston on the back of the board and press it, doing a similar operation with all the latches, you will release the radiator. Next, remove it and replace it with a new one, or you can simply replace the thermal paste.
If the radiator is pressed with brackets, then you will need a screwdriver. The main task here is to bend the bracket away from the fastening hole. This procedure requires the use of physical force, but you should be extremely careful, as a screwdriver that comes off can damage the device.
Removing a heatsink from glue is a very difficult and dangerous operation, as you can easily damage both the processor and the board. The only way out is to heat up the hot melt glue. But this should be done extremely carefully, because overheating can be fatal for the chipset.
Now you have learned how to properly remove the processor from the computer motherboard and the fan and radiator.
Disassembling a system unit for the purpose of maintenance is sometimes a complicated procedure. Especially when it comes to removing the cooler from the processor. The procedure itself is quite simple, but difficulties may arise during the process, especially with different types of fastenings.
Withdrawal procedure
If we put aside the possible nuances, which will be discussed later, the procedure does not seem so complicated. You just have to remember that all actions should be done carefully. The basic rule of disassembly is always: “do not try to apply force, especially if the hardware resists it.” Following this rule will avoid unnecessary mechanical damage. To remove the cooler from the processor you will need:
- Switch off computer.
- Disable surge protector and power cables.
Important! It wouldn't hurt to give the computer stand for 10 minutes before further disassembly. This is due to two factors at once: heating and residual charge in capacitors. The first one is simply unpleasant. The second can cause significant harm to the user and even components if the power supply is poorly insulated.
Note! In general, it is not necessary to completely disconnect the wires and remove the RAM to remove the cooler from the processor, but for the first 10-15 removals it is necessary. So that your hands get used to the operation and cannot cause harm to surrounding components.
- Rent it yourself cooling Fan along with the heatsink from the processor. Almost always they are supplied assembled and are also removed together.
The procedure for removing a cooler from AMD or Intel processors depends on the method of its implementation and may require both minimal effort and enormous physical effort. We will consider each case separately.
Cooler mount
The fastening determines which algorithm of further actions should be applied. The cooling fan can be mounted in the following ways:
- latches (various types);
- screws;
- grooves;
- hybrid options.
Therefore, we will consider each type separately, mentioning the necessary tools.
Latches
Latches are considered a common option for coolers on socket 775 (Intel)
, although they are also found in other specifications. Budget fans are attached to the latches. These latches are the main weak point for such cooling systems. 
To remove the cooler from the processor using the clips, you will need turn counterclockwise 4 mechanisms (it is necessary to make a ¼ circle turn). Grasp the iron part and pull the cooler.
If the latches will break off(they are very delicate and the effort to open borders on the effort to break) it is better to contact a service center. Without proper experience, it is almost impossible to remove or reinstall a cooler with a damaged latch.
Screws
To remove such a cooling system you will need a screwdriver(phillips or corresponding to the type of screw). Or an alternative tool like thin pliers to remove the screw. By exercising prudence and caution, you can handle it with a knife, risking less than opening the latches with your bare hands. 
4 bolts are removed(they are not removed from the fan housing), after which the freed element can be safely removed.
Grooves
Mounting method typical for processorsAMD and their cooling systems. The design looks like this and differs in the lever: 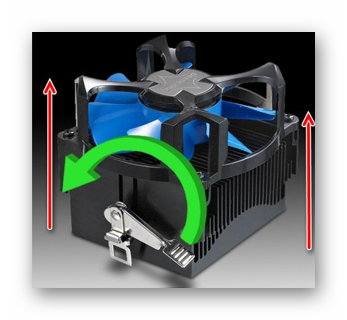
This lever will need to be turned to release the cooling system, after which it can be pulled out.
Combined method
Combined mounting systems are found in so-called branded computers, where latch matches with bolts(less often it occurs all at once). The cooling system is made as simple as possible and is therefore less susceptible to damage during disassembly. 
The disassembly algorithm repeats the steps for each of the corresponding types. The order is followed: first the screws, then the latches. 
Liquid cooling systems are much more difficult to remove. Moreover, the procedure is unique for each model, so it is not possible to describe the general procedure. 
Publications on the topic
-
 All codes for cars, money, weapons
Why do we need cheat codes for games and how to use them Game developers, after the next virtual universe is created,...
-
 How to open XPS? XPS file. How to open it? xps reader
The most common cause of problems with XPS file opening is simply the lack of appropriate applications installed on your...